Ultimate Windows 10 Bloatware Removal Tool | MSMG Toolkit: Delete Bloatware, Cortana, Windows Defender
A Windows 10 OS installation that’s free of all the telemetry data collection, a nagging Cortana, and practically all bloatware — sounds tempting, doesn’t it? Well, strap right in then. A tool called the MSMG toolkit allows you to do just that. And we will show you how to this in simple steps.
First of all, MSMG toolkit is a freeware software available at the Majorgeeks website. This bloatware removal tool for Windows 10 can customize, add, or remove components and features of the Windows 10 operating system. Additionally, the constant updates to this Windows ISO customization tool enable you to edit and change newer Windows 10 versions and also Windows 8.1 or Windows 7.
Remove Windows 10 Bloatware in Simple Steps
To begin with, this free bloatware removing software comes with standard DOS command prompt method. But before you start thinking of how complicated things might get, let me stop you right there. In fact, it is pretty simple and straightforward as you would only have to choose the right options available to you.
Getting Started
Before gettings started, make sure that you have the appropriate ISO build of the Windows OS that you would like to remove preinstalled bloatware. Also, this process of creating a Custom Windows 10 installation is only possible when you are doing a clean install of the operating system.
Furthermore, the MSMG toolkit is a Windows software which is updated quite often, so make sure that you are using the one which supports the Windows ISO version that you would like to customize.
Note: The developer hosts the latest version in his My Digital Life blog site. Bear in mind that you would have to create an account first to download it from there.
Requirements
- Windows Operating System (Windows 10, 8, 8.1,7)
- 2 GB of Ram
- Windows 10 ISO ( Supported with the MSMG toolkit version )
- MSMG toolkit Latest Version ( major geeks or My Digital Life)
- 7-Zip
- WinReducer ESD – Wim Converter 1.8.5.0 (optional)
1. Setup and Launch Windows 10 Bloatware Remover tool
After you have made sure that you have the fulfilled the requirements, let’s begin —
- Extract the downloaded MSMG toolkit to a folder using 7-zip.
- Look for the folder named DVD inside the folder where you have extracted the MSMG toolkit.
- Now, Right-click on the Windows 10 ISO that you have downloaded and Extract it to the DVD folder.
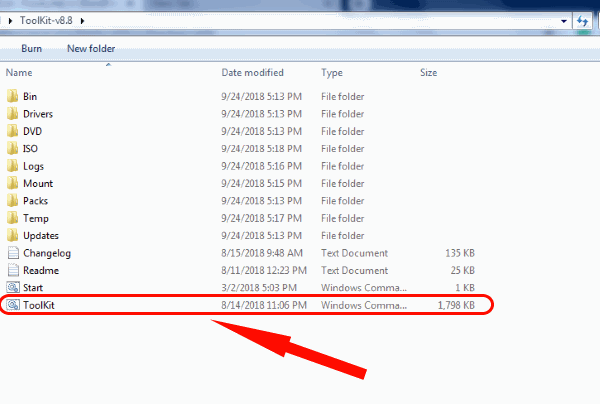
- Finally, we can start the program by running the .cmd file as Administrator.
Importantly, check whether the install file in the folder is of WIM file type. Consequently, you might come across an error showing wrong/unrecognized file type if you have an ESD file. If that’s the case with your installation process, skip to the final section where we show you how to convert an ESD file to WIM.
2. Select Windows 10 Source ISO Edition
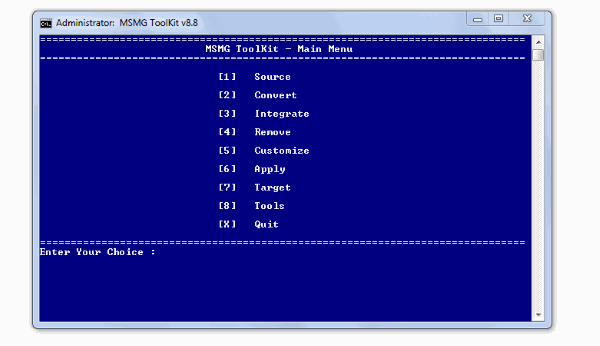
When you launch the MSMG toolkit, the command prompt window pops up with an EULA (End User Licence Agreement). As usual, it says that the developer is not to be held responsible for any of the mishaps like errors or bugs that might happen after installing the customized Windows 10 OS.
But after using this program for a while, it is safe to assume that we have faced no such problems as long as the supported ISO version is used. Not to mention the proper steps to be followed.
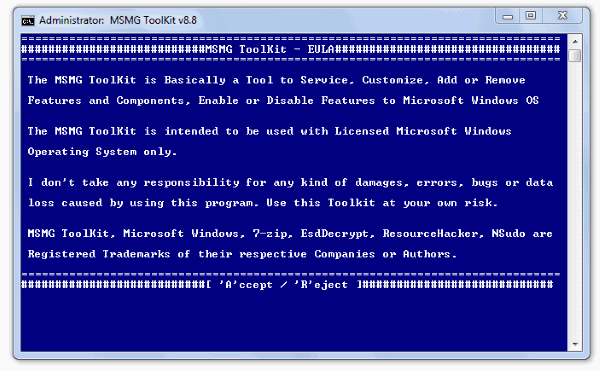
- Press A to accept.
Consequently, you see the range of options available in the software to work with. Initially, you would want to select the source Windows 10 ISO that you want to configure.

- Press 1 to choose the source.
- Then, choose Select Source from <DVD> folder by pressing 1 once again in the subsequent window.
- As multiple editions of Windows 10 is available in the ISO source folder, the program will ask which edition to choose for creating a Custom ISO for.
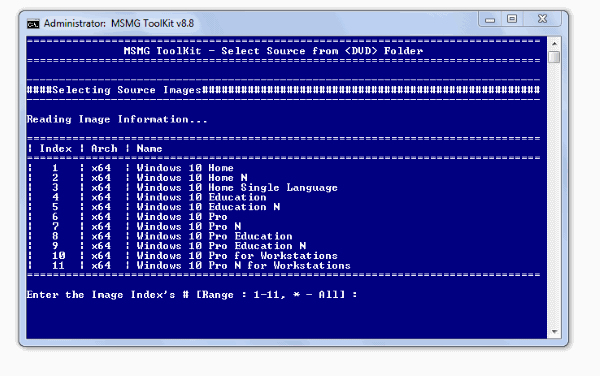
Note: You can choose the editions by specifying a range (eg: 1 to 3) or specific number (2). To select all the editions, press *.
- Answer YES two times by pressing y to continue.
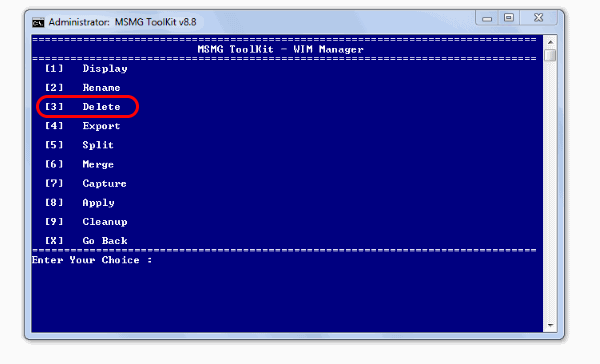
Additionally, you can choose to delete or add editions before you start removing bloatware from Windows 10 edition. To do this,
- Press 8 to select tools from the main menu.
- Then, Press 1 to select Wim Manager.
- Now, Press 3 to select Delete.
- You can now choose to delete the specific edition for which you do not want to create a custom Windows 10 ISO.
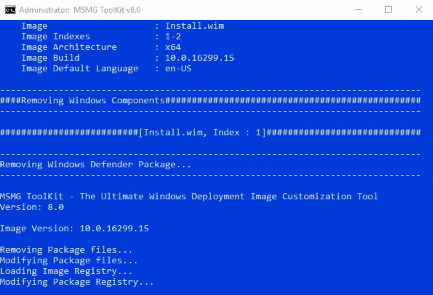
After waiting for a few moments for the process to complete, you can now start removing apps, features, and components, including Cortana and Windows Defender from Windows 10
3. Remove Bloatware apps and components from Windows 10
Aside from removing Windows 10 Cortana and Windows Defender, you can remove the pre-installed Microsoft apps. Even the complete app store can be removed if necessary. To start the fun part of uninstalling Windows 10 bloatware,
Remove Metro Apps and Associations
From the Main Menu,
- Press 4 to Select Remove.
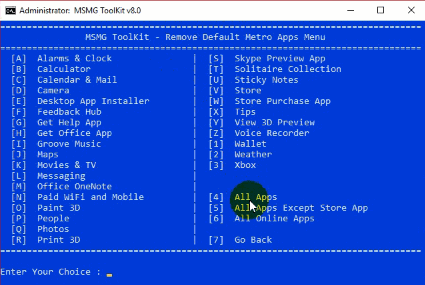
- First of all, to remove Metro apps, Press 1 to Select Remove default Metro apps.
Now, you will be presented with all the metro apps in the Wim image. You can choose to:
- Remove Windows 10 Store apps one by one by pressing the appropriate assigned for each app.
- Or Remove all Metro apps at once by pressing 2.
- Removing all metro apps except the Store App by pressing 3.
- Uninstall all Bing Metro Apps by pressing 4.
- Completely Remove all Online Apps by pressing 5.
Furthermore, eliminating the bloatware apps from Windows 10 requires you to wait for some time for the process to complete especially if you chose to remove a whole lot of them.
Also, It would be only appropriate to remove the metro app associations once you have removed all the metro apps. For this,
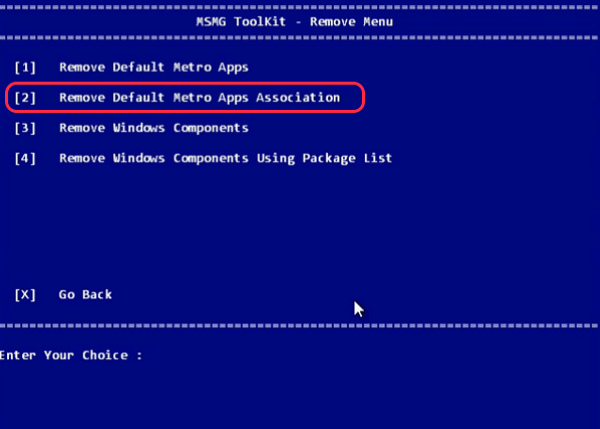
From the Main Menu,
- Press 4 to Select Remove.
- Press 2 to Select Remove default Metro apps Associations.
Remove Windows 10 Components and Features
Now let’s get down to business, shall we? After all, for some removing or uninstalling the ever so annoying Telemetry data collections and the “never to be enabled” Cortana in Windows 10 is the best of their intentions.
Note: Make sure that you do not have updates or language packs or frameworks to be integrated to the ISO before doing this step. Integrations after removal of components are not recommended as this can cause a whole lot of problems. So, Skip to integration steps before attempting to remove.
To remove Windows 10 Cortana, telemetry and other features and components,
- Press 4 to Select Remove from the main menu.
- Now, press 3 to Select Remove Windows Components.
- Press Y if you choose to continue after reading the warning message.
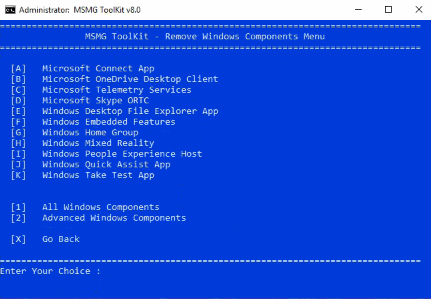
As in the case of removing Windows 10 inbuilt applications, we are presented with the many components and features available on Windows 10. You can either remove Windows components one by one (by pressing the appropriate letter) or Uninstall all Windows components at once ( Press 1 ).
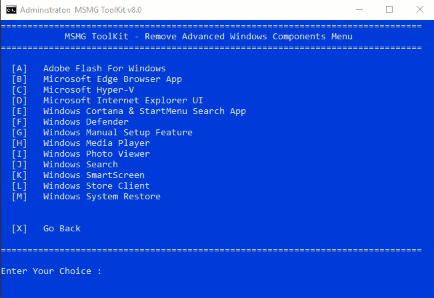
Also, you could have a look at the other Advanced Windows 10 bloatware Components that you can remove by pressing 3 to carefully choose to keep or not.
Just make sure the features that you are removing are not needed in Windows 10 for your particular use of the Operating System. Not all software and components in Windows 10 are bloatware. Hence, we recommend you choose wisely.
4. Disable Windows 10 Automatic Driver Updates and other tweaks (Optional)
Most important among the features of this best bloatware removal tool for Windows 10 is the additional tweaks option. Here, you can perform some nifty actions like Disable Automatic driver updates through Windows, Disable Cortana App entirely or even Disabling automatic downloading and Installing of 3rd Party Apps.
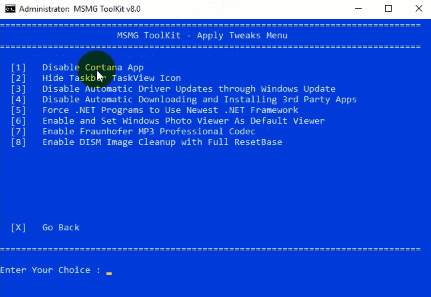
To customize/disable Windows 10 Settings,
- From the Main menu, Press 5 to select Customize.
- Again, Press 5 to Select Apply Tweaks.
- Finally, select the tweaks that you want to execute by pressing the corresponding number assigned with it.
5. Integrate Windows 10 Updates and Language Packs
We kept this at last because this is optional and only needed if you have particular Windows features, Updates, Drivers and Language packs needed to be integrated to the source Windows 10 ISO that we are customizing.
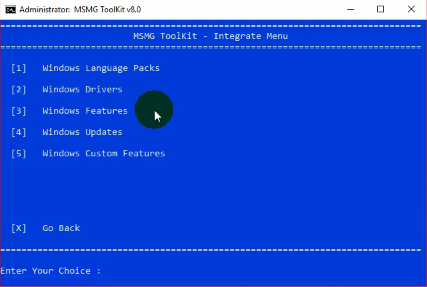
Most users might find this unnecessary and would be willing to skip it. In case, if you want to know how to do this,
- Press 3 to Select Integrate.
- Press the corresponding option that you would like to integrate and follow the steps accordingly.
6. Apply Changes to Source WIM Image
Now that’s all done let’s apply all these changes before we create our very own custom Windows 10 ISO.
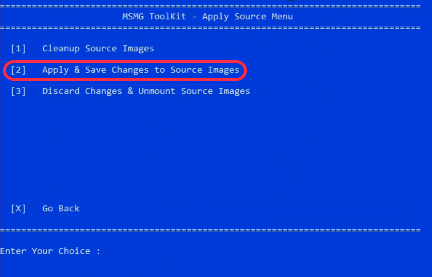
From the Main Menu,
- Press 6 to Select Apply.
- Further, In the Apply Source menu, Press 1 to Apply Changes to Source WIM Image.
Consequently, after you wait for a few moments, the changes will be applied.
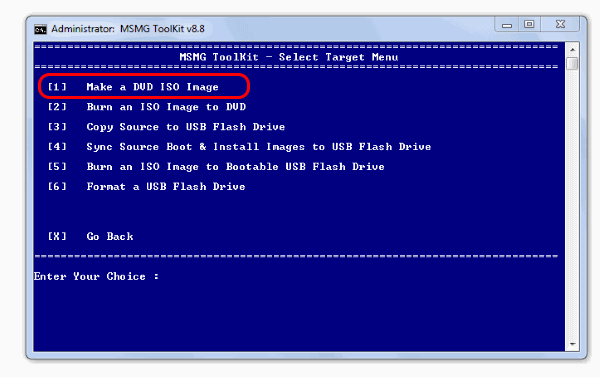
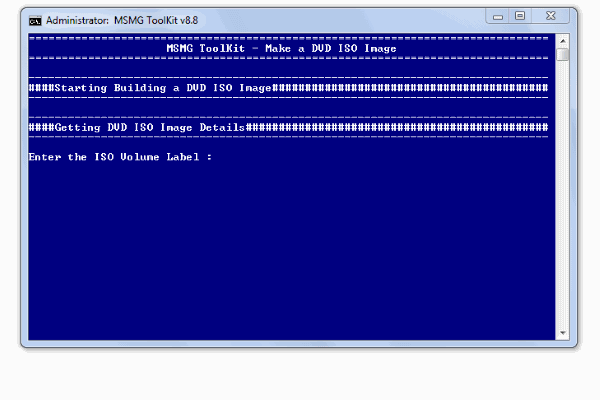
7. Make an ISO DVD image
Finally, its time to build your very own custom Windows 10 ISO image. To start building the ISO,
- First of all, from the main menu, press 7 to Select Target.
- Then, Choose 1 to Select Make a DVD ISO Image.
- Furthermore, the program will ask for an ISO Volume Label and ISO filename. Enter as you prefer.
- Hence, after these names are entered, build process of your Custom Windows 10 Bloatware-free ISO.
Finally, Press x from the Main menu to Quit the Windows 10 Bloatware program.
Convert ESD file to WIM
As mentioned in the requirements, you might need the WinReducer ESD – Wim Converter application for this purpose. Additionally, there are many other tools available for exactly this need. But for the reason that it being one of the most popularly used and the fact that it worked pretty well for us, we recommend this ESD to WIM tool.
Setup the application
To use this software to convert ESD file to WIM,
- First of all, Extract the downloaded zip to a folder of your choice.
- A window will pop up asking whether if you want to Activate this application. If you want to activate it, go right ahead. You can proceed even if you click no.
- Now, if you are opening the application for the first time, a configuration error window will pop up. Certainly, this is due to the fact that no configuration file exists.

- After you click ok, the program will launch.
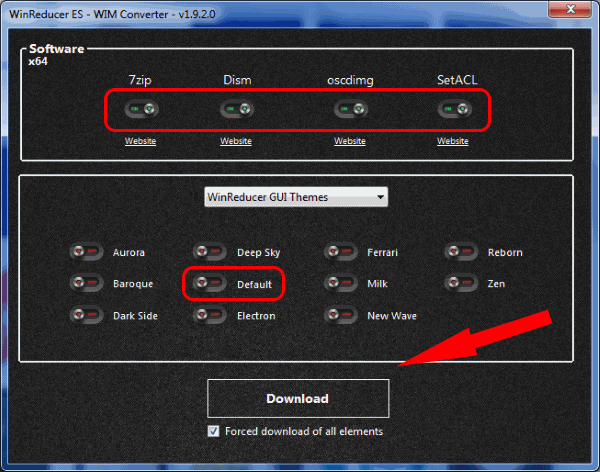
- Click Software Installation. Then, turn off the default under WinReducer GUI theme.
- Turn on all 4 ( 7-zip, Dism, oscdimg, SetACL) under Software x86 and click Download. Probably, the process would take less than a very few minutes and the application will automatically close itself.
Convert esd type to wim
Now you have set up the application and it is now ready to convert you ESD file to WIM. For this,
- After the esd converter application loads up again, Click Open and browse to the ESD file located in your source (usually PATH_To_TOOLKIT_FOLDER/DVD/sources/install.esd).
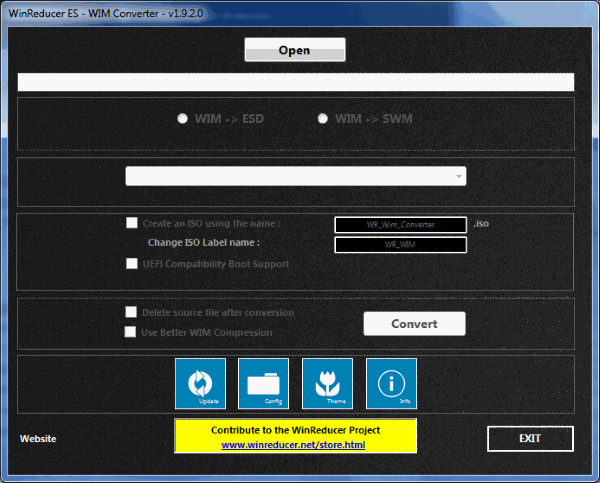
- If the esd file that you have chosen is compatible, it will say so in green as shown in the picture. Choose ESD -> WIM option.
- Choose which Windows edition are you looking for. In case you need all of them, select Keep all Windows Editions.
- There are a couple of optional settings remaining that are self-explanatory. We recommend keeping them unchecked unless you have to.
- Click Convert and wait while the process finishes which is usually about 10 minutes or so.
- Exit the program after it successfully finishes.
Consequently, you can go to the toolkit sources folder to have a look. There should be both the new wim file along with esd file (Depending on whether you chose to delete the original esd file after conversion in the program).
MSMG: Windows 10 Bloatware Removal tool
So that’s pretty much about it. As usual, we hope this article was of some use to you guys. Especially for the people who have spent countless hours on the web trying to figure out how to disable/remove some of the core components of Windows 10, this tool can be a godsend. Use the comment section below to mention if you guys ran into trouble during these steps. Keep reading Fossbytes.
Also Read: 10 Ways To Fix 100% Disk Usage In Windows 10