10 Ways To Fix 100% Disk Usage In Windows 10
If you’re a Windows user, you might have come across the 100% disk usage problem. Looking at the numbers in the task manager, it seems that your hard drive is doing some seriously hard work. In reality, your machine is sitting idle doing nothing but playing your favorite song. I don’t think the media player would be responsible for keeping your hard drive busy up to its full capacity. It’s been a long time since Microsoft released Windows 10, but you can still witness tons of reports with terms like Windows 10 disk usage 100.
I didn’t see the issue on my machine, at least, not in the last couple of years. Maybe, it might have gone unnoticed. But many people say their disk usage always touches 100%, and their machine slows down.
Also Read: How To Use RAM As Hard Drive? How To Create RAMDisk?
Anyway, I landed on this problem recently and thought I should dig more into it. After browsing through various forums and threads, I realized there is no particular cause to 100% disk usage problem in Windows, there are many. So, let’s tell you the reasons behind disk always touching the sky!
What causes 100% disk usage in Windows?
Many people have blamed applications like Google Chrome (I’m not surprised) and Skype which trigger some unwanted high disk usage on the machine. The list further extends to include features like Superfetch, Print Spooler, BITS, etc.
Disabling these services can help, but it may have consequences. For instance, if you cut off the Spooler, your printer won’t work until you re-enable it. And it doesn’t even guarantee that the problem would get resolved, but you have to take the shot.
The 100% disk usage problem can also occur if your system is infected with some malware. The very basic idea to fix the high disk usage problem is to spot the application or Windows component responsible and stop it.
How to fix 100% disk usage in Windows 10?
You can use the task manager in Windows 10 to find the applications and services that are consuming more disk resources. Under the Processes tab, click the Disk Usage column to arrange the numbers in descending order. Then you’ll know what application is trying to steal more than it deserves.
1. Fix 100% Disk Usage due to Google Chrome
In the case of Google Chrome, the web page pre-load feature is at fault. You can turn it off by visiting Settings > Show Advanced Settings > Privacy. Here, untick the option called Prefetch resources to load pages more quickly.
The newer versions of Chrome feature an entirely redesigned Security page. You can search for Use a prediction service to load pages more quickly toggle option under Privacy and security heading.
Also Read: 12 Easy Ways To Maximize Battery Life On Windows 10
2. Fix 100% Disk Usage due to Skype
For Skype, the high disk usage goes down when write permission is granted for ALL APPLICATION PACKAGE group. Follow these steps to fix 100% disk usage issue if it’s because of Skype. This method is for the desktop version of Skype, not for the Windows Store version.
- Start with closing the Skype app. Right-click its icon in the taskbar and click Quit or you can use the Task Manager.
- Now, open This PC or My Computer and navigate to C:\Program Files (x86)\Skype\Phone\
- Right-click the file Skype.exe and go to Properties.
- Under the Security tab, select ALL APPLICATION PACKAGES and click Edit.
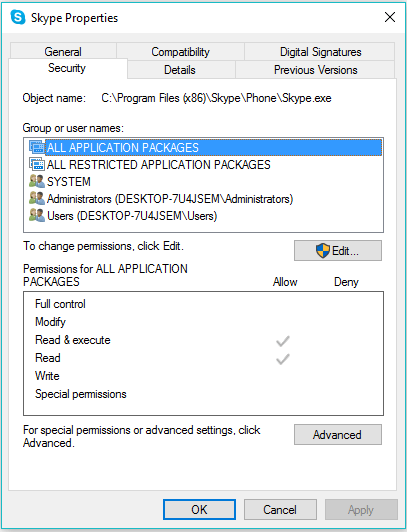
- On the next box that appears, select ALL APPLICATION PACKAGES, and tick Allow checkbox for Write permissions.
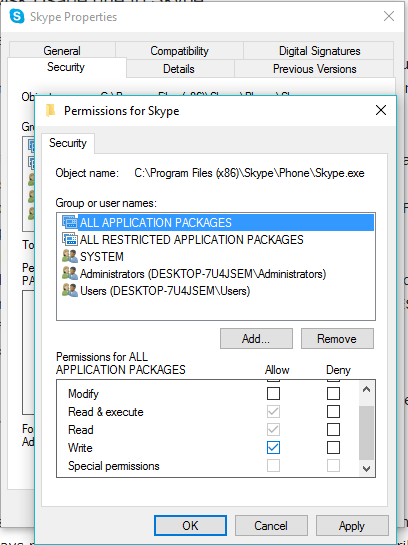
- Click OK to save and continue. Click OK again.
After making these changes, if Skype is responsible, you might observe a reduction in the disk usage when you open the task manager.
3. Fix 100% Disk Usage due to Windows features
A Redditor also suggested disabling the Windows Search service. Given the fact that the service is always running in the background, it might have some contribution to making the situation worse if not initiate it. It has been known to run “search loops” in Windows due to a bug. You can temporarily turn off (it’ll re-enable when you restart) Windows Search using the command line in Windows to see if it’s causing 100% disk usage.
There are many users, including me, who don’t use Windows Search that often. It’s probably due to the fact that today everything’s cloud-based and one rarely accesses the files stored on the disk. If that’s the case with you, feel free to disable Windows file search and enjoy a faster experience.
Open Command Prompt as administrator and use the following command:
net.exe stop “Windows Search”
Use this command to start Windows again:
net.exe start “Windows Search”
How to turn off Windows Search?
- Press CTRL + R to open the Run utility.
- Type services.msc and press Enter.
- Now, look for Windows Search in the list.
- Right-click the Windows Search service and go to Properties.
- Under the General tab, set the Startup type to Disabled.
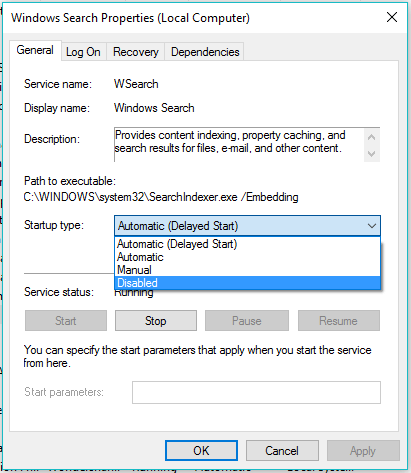
- Click Ok to save and continue.
Also Read: How To Repair A Corrupted Hard Drive And Fix My Storage Disk?
4. Fix 100% disk usage because of Superfetch
In the past, we have already told you what SuperFetch can do. Sometimes, bug related to the data pre-loading feature may make you experience high-disk usage on your Windows machine. So, you can disable SuperFetch for a while.
Run CMD in Admin mode and type the following command:
net.exe stop superfetch
Press enter.

Now, you can wait for sometime to see if there change in the high disk usage in the Task Manager. You can also run a simple disk check on your system.
Use the command to enable it:
net.exe start superfetch
Alternatively, you can use the ‘services.msc’ utility to disable Superfetch on Windows. Like, it’s done for Windows Search. Look for Superfetch in the list of services.
5. Disable Windows tips
Windows 10 Settings includes an option to display tips and tricks. Some users have linked it to the disk usage problem. You can disable tips by visiting Settings > System > Notifications & actions. Turn off Get tips, tricks, and suggestions as you use Windows toggle button.
6. Perform a disk check
A good way to spot issues with your Windows installation is performing the disk check using your computer’s inbuilt disk check utility. To do so and, take care of Windows 10 100 disk usage, perform the following simple steps one by one:
- Click Windows key and X at the same time and go for Command Prompt (Admin) option to run CMD with administrative privileges.
- Click Yes on the prompt window.
- Now type following command in command prompt and hit enter:
chkdsk.exe /f /r - Now type Y to confirm the disk check during the next restart.
- Now during next restart, disk check utility will run. Now check the disk usage again in Task Manager to see if the problem has been fixed.
Also check out our guide on best hard disk drive eraser tools to give it a fresh start with zero errors.
7. Fix your StorAHCI.sys driver
Another cause for your hard drive going full capacity is a firmware bug in Microsoft AHCI driver called StorAHCI.sys. It’s known to cause the 100% hard disk problem and even BSODs in Windows. Follow these steps to disable Message-Signaled Interrupts support for the driver and fix the issue:
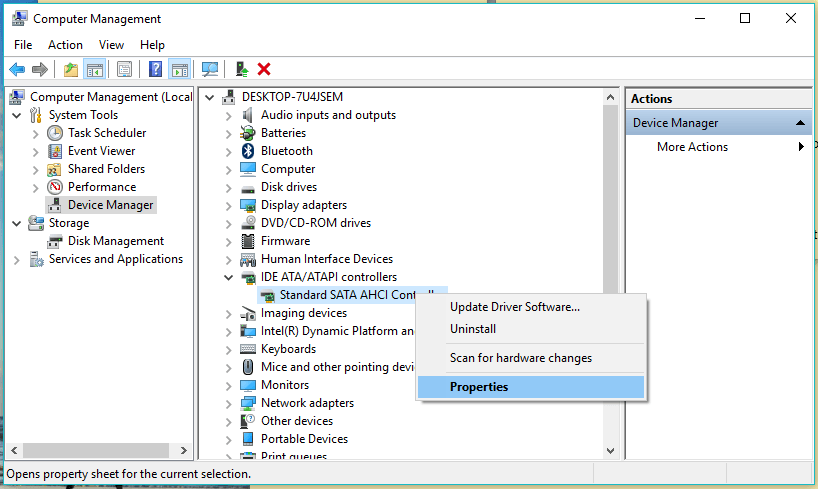
- Open Device Manager (Right-click This PC > Manage > Device Manager).
- Extend the IDE ATA/ATAPI controllers entry in the list.
- Right-click Standard SATA AHCI Controller and go to Properties.
- Under Driver tab, click Driver Details. If it shows C:\Windows\system32\DRIVERS\storahci.sys in the Drivers files field, then your system might be affected due to the bug.
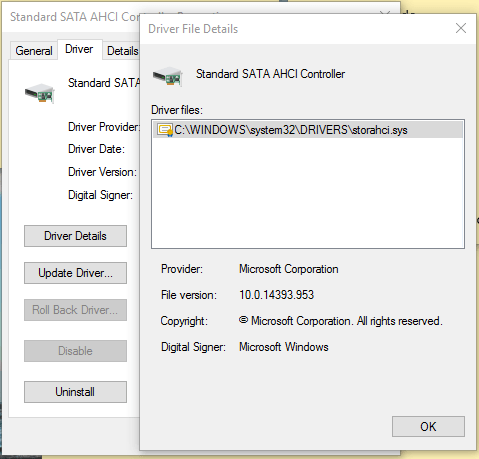
- Now click OK and go to the Details tab.
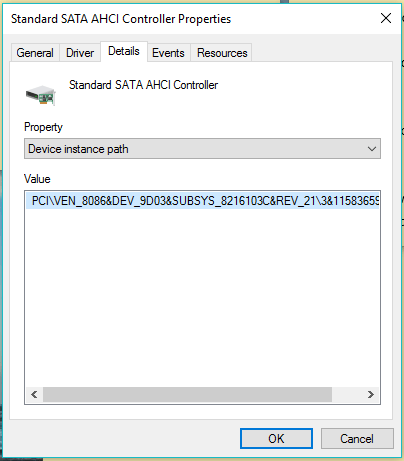
- Select Device instance path from the drop down menu. You can copy the value present there to some text file or keep the box open.
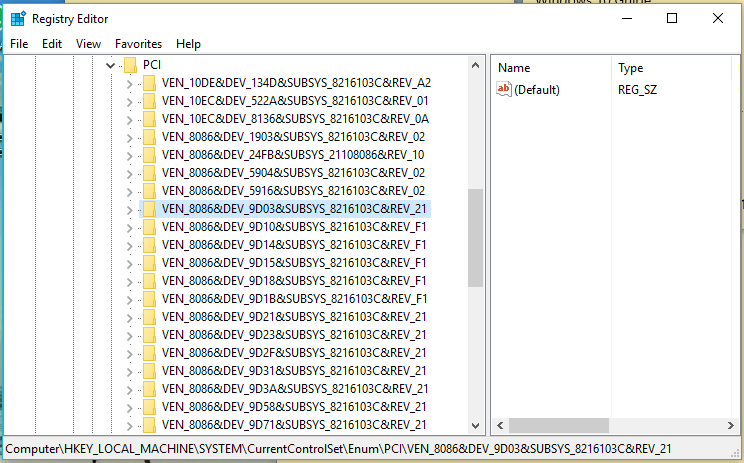
- Now, open Windows Registry (Windows + R > Type regedit).
- Navigate to:
HKEY_LOCAL_MACHINE\System\CurrentControlSet\Enum\PCI\
Look for the value you saw in the Properties and expand the relevant key. Make sure you expand the correct key.
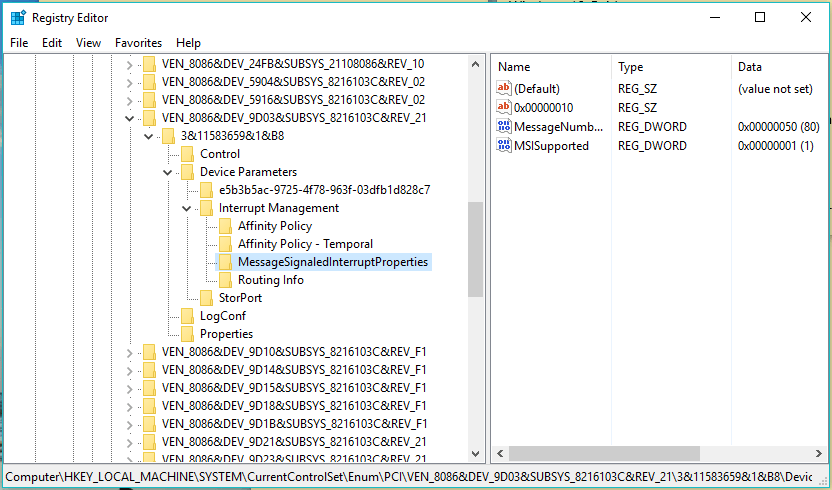
- Once you have found the correct AHCI Controller using the given string, navigate to:
Device Parameters\Interrupt Management\MessageSignaledInterruptProperties
- Here, double-click MSISupported and change it’s value to 0 (means turn off the MSI).
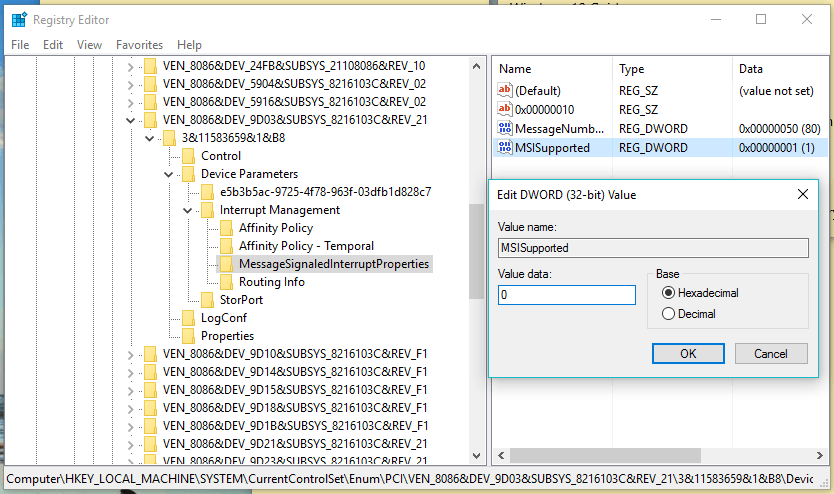
- Click OK to save the value. Close Windows Registry and restart your machine.
8. Disable Adobe Flash to fix 100% disk usage
Adobe Flash is already counting the days for its extinction. The software has always blamed for many vulnerabilities and loopholes it possesses. But it’s also associated with the 100% disk usage in Windows.
Despite the wave of HTML5, some people still use Flash on their system because many applications run on it. And if you’re one of the Flash users experiencing high disk usage, you might consider disabling Adobe Flash to see if it’s at fault or not.
9. Check for some evil software on your computer
It might be possible that some malware is responsible for consuming 100% HDD resources on your computer. Try running a full scan using the inbuilt Windows Defender, or take the help of some third party software.
10. Reset virtual memory for 100 disk usage fix
You might have come across the term virtual memory while reading about the RAM management in Windows 10. When your computer’s RAM isn’t enough for processes, Windows stores files in the virtual memory and keeps swapping them to RAM when needed. You can also reset Windows 10 virtual memory to fix high disk usage.
You can read this existing article on fossbytes.com and follow the steps mentioned to fix Windows 10 slow performance.
If every road is taking you nowhere, then the last option would be to reset your Windows OS. It might be time-consuming but can help if your daily usage is getting affected due to the issue.
So, these were some of the ways which can help you fix the 100% disk usage error in Microsoft Windows. These might not be fool-proof solutions, but they could be useful.
Got something to add? Drop your thoughts and feedback.
Also Read: How To Backup Data In Windows 10 Using File History?