How to Protect Your Windows Machine Against the FREAK Hack Attack

FREAK’s man-in-the-middle attacks are the result of the security mistakes made 20 years ago. Initially, it was thought that Windows machines are immune from the FREAK encryption flaw but a couple of days ago it was revealed that it isn’t the case. This SSL and TLS security hole isn’t just in Apple and Android, FREAK is present in Microsoft’s SChannel (Secure Channel) stack too.
Microsoft said in a release:
“Microsoft is aware of a security feature bypass vulnerability in Secure Channel (Schannel) that affects all supported releases of Microsoft Windows. Our investigation has verified that the vulnerability could allow an attacker to force the downgrading of the cipher suites used in an SSL/TLS connection on a Windows client system.”
Any program using Microsoft’s SSL/TLS on Windows 7, Windows 8, Windows 8.1, Windows Vista and Windows Server 20013 are vulnerable to this attack. It’s not confirmed about the rest, so it shouldn’t be assumed that Windows XP, Windows Server 2008 and 2012 are safe.
Microsoft will release the security fixes in some time. If you are willing to take some extra measures, Microsoft has released some steps which should be followed to disable the RSA key exchange ciphers which lead to FREAK attack. You’ll have to use the Group Policy Object Editor to do this. This trick doesn’t work on Windows Server 2003 because it doesn’t allow these ciphers to be enabled and disabled individually.
How to Protect Your Windows Machine Against the FREAK Hack Attack?
To disable the RSA key exchange ciphers, follow the following steps:
– Open Command prompt and type gpedit.msc and press Enter to start the Group Policy Object Editor.
– Expand the Computer Configuration, Administrative Templates, Network, and then click SSL Configuration Settings.
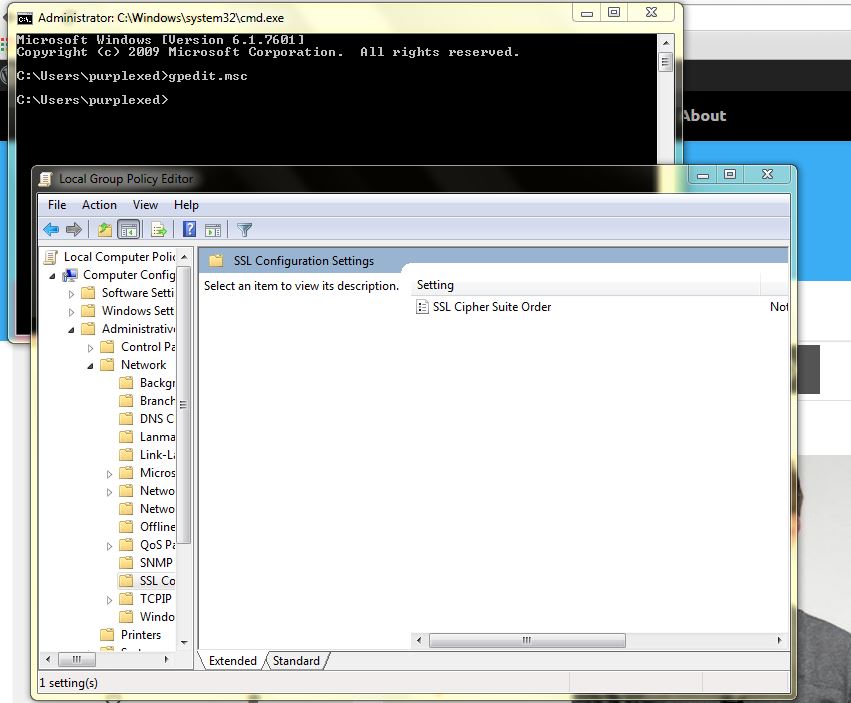
– Click on SSL Cipher Suite Order under SSL Configuration Settings.
– Scroll down to the bottom in the SSL Cipher Suite Order
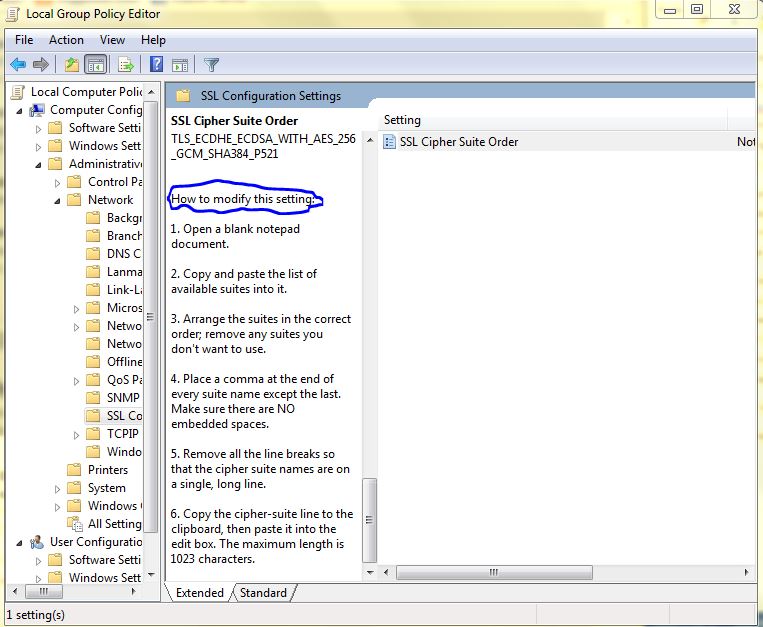
– Read the instruction labeled How to modify this setting. Now enter the following list of ciphers.
TLS_ECDHE_RSA_WITH_AES_256_CBC_SHA384_P256,
TLS_ECDHE_RSA_WITH_AES_256_CBC_SHA384_P384,
TLS_ECDHE_RSA_WITH_AES_128_CBC_SHA256_P256,
TLS_ECDHE_RSA_WITH_AES_128_CBC_SHA256_P384,
TLS_ECDHE_RSA_WITH_AES_256_CBC_SHA_P256,
TLS_ECDHE_RSA_WITH_AES_256_CBC_SHA_P384,
TLS_ECDHE_RSA_WITH_AES_128_CBC_SHA_P256,
TLS_ECDHE_RSA_WITH_AES_128_CBC_SHA_P384,
TLS_DHE_RSA_WITH_AES_256_GCM_SHA384,
TLS_DHE_RSA_WITH_AES_128_GCM_SHA256,
TLS_ECDHE_ECDSA_WITH_AES_256_GCM_SHA384_P384,
TLS_ECDHE_ECDSA_WITH_AES_128_GCM_SHA256_P256,
TLS_ECDHE_ECDSA_WITH_AES_128_GCM_SHA256_P384,
TLS_ECDHE_ECDSA_WITH_AES_256_CBC_SHA384_P384,
TLS_ECDHE_ECDSA_WITH_AES_128_CBC_SHA256_P256,
TLS_ECDHE_ECDSA_WITH_AES_128_CBC_SHA256_P384,
TLS_ECDHE_ECDSA_WITH_AES_256_CBC_SHA_P256,
TLS_ECDHE_ECDSA_WITH_AES_256_CBC_SHA_P384,
TLS_ECDHE_ECDSA_WITH_AES_128_CBC_SHA_P256,
TLS_ECDHE_ECDSA_WITH_AES_128_CBC_SHA_P384,
TLS_DHE_DSS_WITH_AES_256_CBC_SHA256,
TLS_DHE_DSS_WITH_AES_128_CBC_SHA256,
TLS_DHE_DSS_WITH_AES_256_CBC_SHA,
TLS_DHE_DSS_WITH_AES_128_CBC_SHA,
TLS_DHE_DSS_WITH_3DES_EDE_CBC_SHA
– Click OK and close the editor and restart your system.
What will this change do?
– Due to this change, Windows won’t connect to the system that don’t support the ciphers listed above.
Source: Microsoft Blog
Did you find this post helpful? Share it with your friends to save them from the FREAK attack!
Stay tuned for latest technology news from fossBytes!