Cyberpunk 2077 Braindance Guide: How To Find ‘Relic’ In Yorinobu’s Apartment?

Cyberpunk 2077 Braindance is one of the best things that CD Projekt Red included in the game. You can think of Braindance as the advanced version of VR, in which people can feel everything they see. For instance, in the Cyberpunk 2077 Braindance tutorial, V sees the memories of a thug who got shot while robbing a store. Besides witnessing the entire scene from the thug’s eyes, V actually feels the pain of getting shot.
In the futuristic world, players can make use of Cyberpunk 2077 Braindance to find certain clues. That’s why, right after completing the tutorial, V sees the memories of a woman, Evelyn, to find a relic in Yorinobu’s apartment. Now, getting the hang of the Cyberpunk 2077 braindance feature might feel difficult at first. It further means that new players often find themselves stuck at Yorinobu’s apartment, struggling to find the relic. Well, no worries, because in this Cyberpunk 2077 Braindance guide, we’ll tell you everything about this in-game feature. So, let’s get started.
Cyberpunk 2077 Braindance Layers
In Braindance’s edit mode, players can switch between three different layers, i.e., Visual, Audio, and Thermal. Understanding these BD layers is important if you want to find the relic in Yorinobu’s apartment.
Note: To switch between different BD layers, the default key on PC is ‘Shift.’
Visual Layer
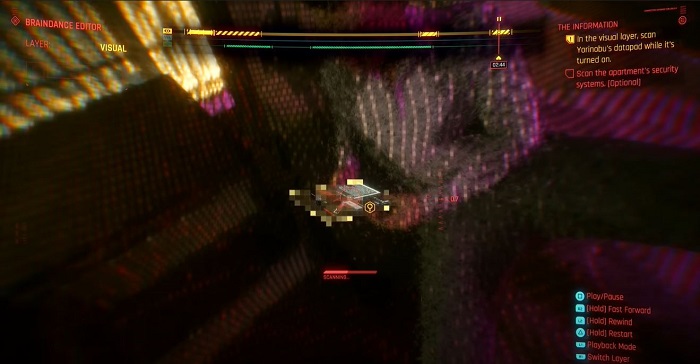
Cyberpunk 2077 BD’s visual layer lets you see exactly what’s in front. You witness the memory recording of a person through a camera that helps you spot small details. For instance, you can move the camera to spot someone passing a weapon and then scan it to gather more intel.
Audio Layer
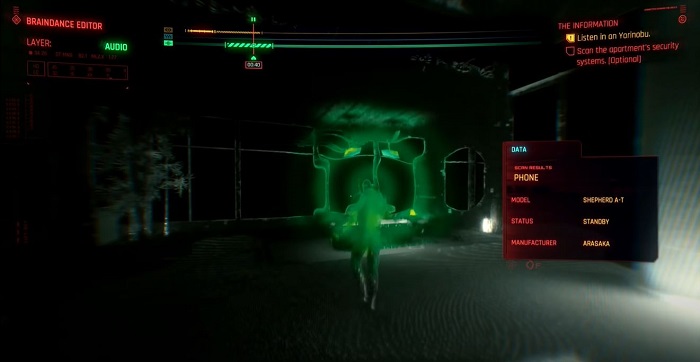
In Cyberpunk 2077 Braindance’s audio layer, players can see green waves originating from different sources. These green waves let you hear important conversations or other essential sounds, providing you with some critical intel.
Thermal Layer
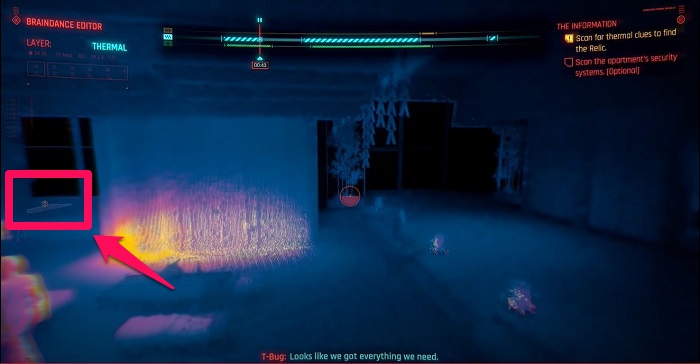
The third and the last Cyberpunk 2077 BD’s layer enables you to scan the heat/cold signatures in the entire place. With that, you can pick up things like a table lamp, computers, and people’s bodies.
How to Find The Relic In Yorinobu’s Apartment?
First thing first, it’s important that you watch the entire recording from Evelyn’s perspective to connect with the story.
As soon as you enter Yorinobu’s Arasaka’s Suite, you will be first greeted by the Cyborg, Atom Smasher, with a lovely and respectful comment. After that, you will see Yorninobu doing a video and audio call talking about his father, Saburo Arasaka.
When the recording is complete, press ‘Tab’ and switch to Braindance Edit mode. Also, note that the camera will disconnect if it is far away from Evelyn. So, make sure you keep the camera close to Evelyn every time.
First, you have to switch to the Audio layer, and you’ll see different green waves across the suite. One Green wave will originate from Yorinobu’s phone, so focus the scanner on Yorinobu’s head to hear his conversation on the phone. Make sure to hear the entire conversation to understand what’s really going on between Yorinobu and Saburo.
After scanning the audio clues, you have to scan Yorinobu’s datapad. For that, you have to switch from Audio to Visual layer using the ‘Shift’ key on PC. Yorinobu will turn on his datapad for a brief period sitting on his bed. Then, he will keep the data in the drawer beside the bed. So, you have to start scanning the datapad when Yorinobu is using it on the bed and move the scanner with the datapad towards the drawer; or you could pause the recording and then start scanning the datapad.
Finally, after scanning the datapad, you have to use the Thermal layer to look for cool storage in which the relic is hidden. For that, you have to look towards the far left corner of the room. There, you have to scan a small proportion of the floor where the Relic is hidden.
That’s it, you have now found the Relic hidden in Yorinobu’s apartment. Now, all that’s left for you to do is start the heist mission to steal the Relic.
Please note that this is a developing article; so, we’ll be updating our Cyberpunk 2077 Braindance guide regularly. Also, if, for some reason, you still find yourself stuck on the above mission, then don’t hesitate to ask us your query in the comments.

