How To Enable Android Developer Options, USB Debugging, OEM Unlock?

Android Developer options are not everyone’s cup of tea since Google decided to hide it from plain sight starting with Android 4 Jellybean. But, Android OS has come a long way since that time and you can easily enable developer options. Moreover, a few million active Android users have now become 2.5 billion worldwide.
Naturally, the number of people wanting to tweak with their Android has increased. Since every other Android guide on the Internet, even many of ours, need users to enable Android developer mode and involve USB debugging, and possible OEM unlocking; ironically, here is another Android guide just to do that.
How to enable developer options, USB debugging, OEM unlock?
If you encounter words such as “USB debugging” or “OEM Unlock”, then it is time to enable the developer options in your Android device.
Android Developer Options
The below-mentioned steps are generic for all the Android devices running Stock Android [Pixel Launcher, and Android One]. As for devices running forked Android versions [MIUI, EMUI, ONEUI, etc], you may find a little deviation from the below process.
Here is how to access Android developer options:
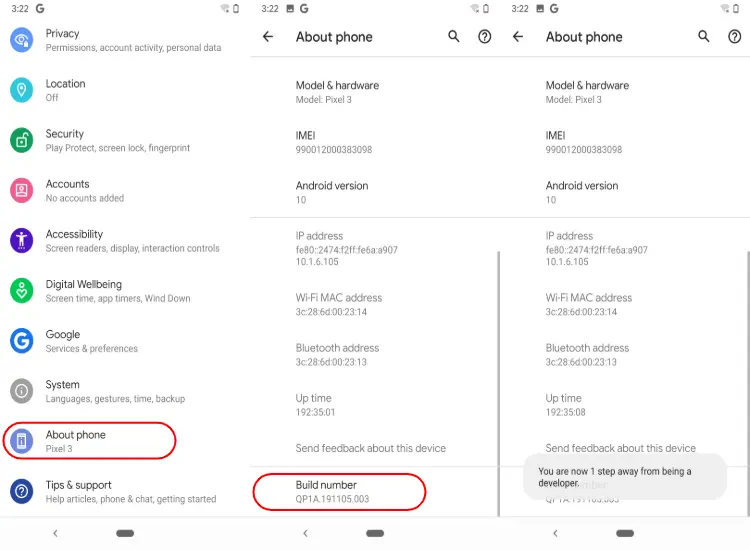
- Open Settings
- Tap on System — About phone
- Scroll down and look for Build Number
- Tap on Build Number option five to seven times. You will see a pop-up each time you press on it, “You are [X] number of times away from being a developer”
- Once you have tapped enough times, you will see a message, “You’re now a developer”
- Go back to main Android settings
- Scroll down, then tap on the System option
- Tap on Advanced. You will now see the developer options
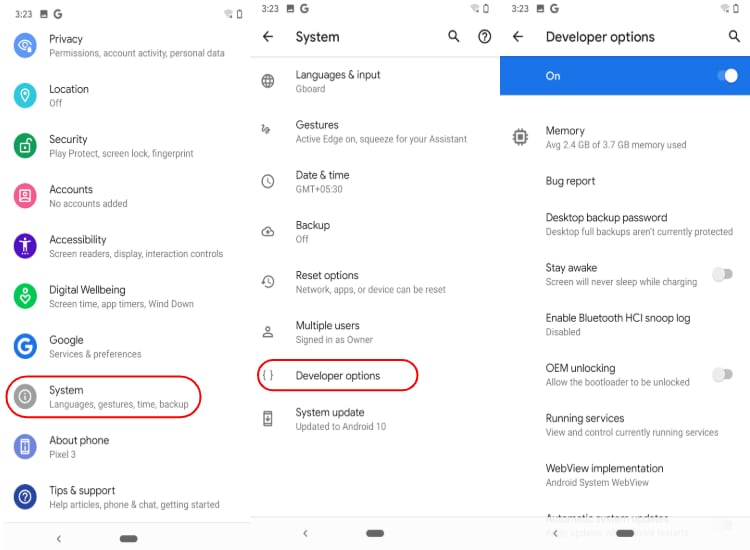
Once you are under Developer settings, there are a bunch of things you can do. Of course, there is a USB debugger and OEM unlocker, but there are several interesting app developer options that I’ve talked about at the end of this article.
USB Debugging
Turning on USB Debugging mode allows systems to communicate with the Android device. Under normal conditions, users can use the USB connections only for charging the device and sending files.
With USB Debugging enabled, users can send system commands to the Android device to perform developer-level tasks such as flashing the device, installing various patches, third-party android apps, and more.
Here is how to enable USB debugging in Android Developer options –
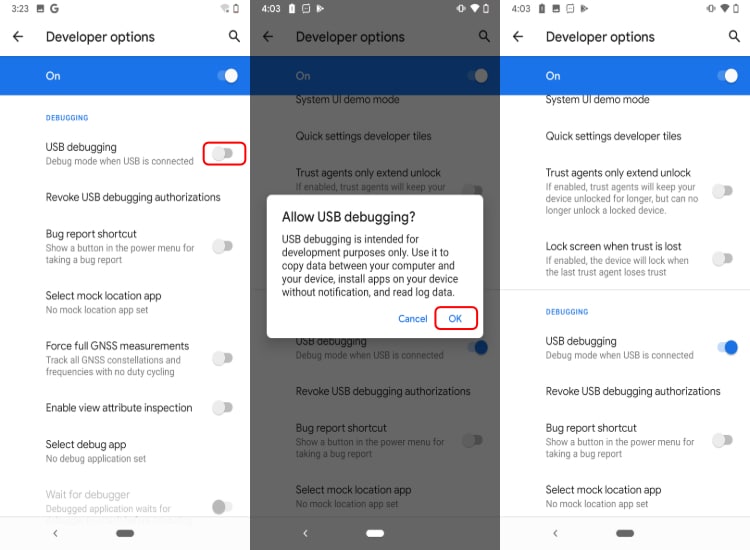
- Enable the developer settings in Android
- Scroll down to the “Debugging” section
- Enable USB Debugging
- Allow USB Debugging by tapping on “OK”
OEM Unlock
OEM Unlock is enabled before unlocking the bootloader. Android Smartphone manufacturers keep the OEM Unlock tucked away in the developer options since the majority of users would have no use of the settings.
Here is how to enable OEM Unlock in the Android developer settings –
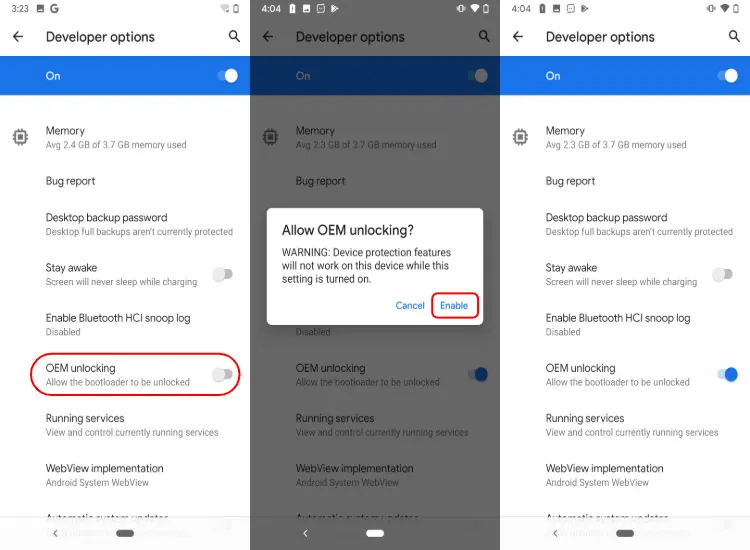
- Enable developer option in Android
- Tap on “Enable” to toggle OEM Unlocking
It is important to note that the process of unlocking bootloaders varies on the device manufacturer. For instance, Xiaomi devices have no OEM Unlock toggle, instead, they have a setting called “Mi Unlock”.
How to Disable Developer options in Android?
If you have restored the default settings in developer options, there is no need to disable them, other than the case where the Developer settings tab is interfering with your perfectionist side.
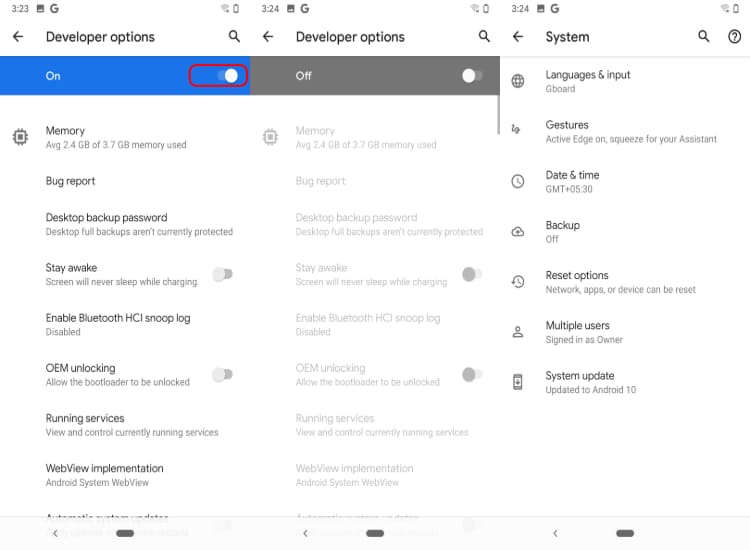
If that is the case, then simply toggle off the developer options and the tab will wipe away from the Android settings. Users unable to hide the developer options can follow the below method: –
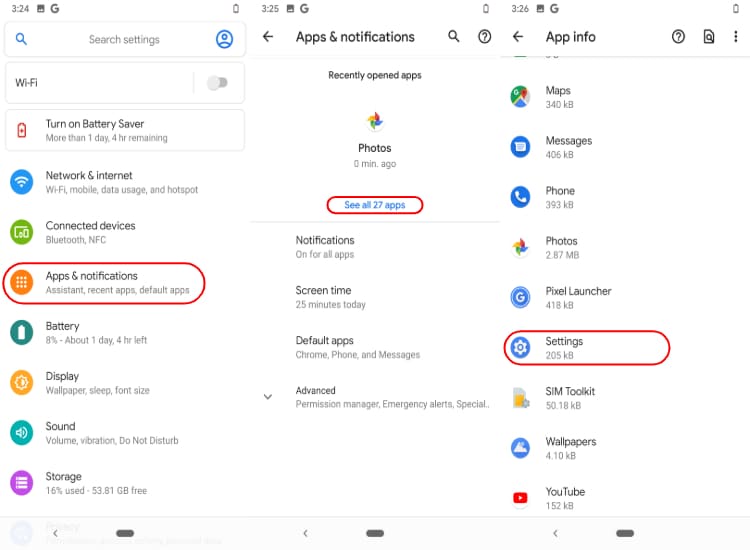
- Go to Android settings
- Scroll down to Apps and Notification
- Tap on the App info menu
- Locate the Settings app and tap on it
- Tap on Storage and Cache
- Now, click on clear storage. This will remove Developer options from the settings.
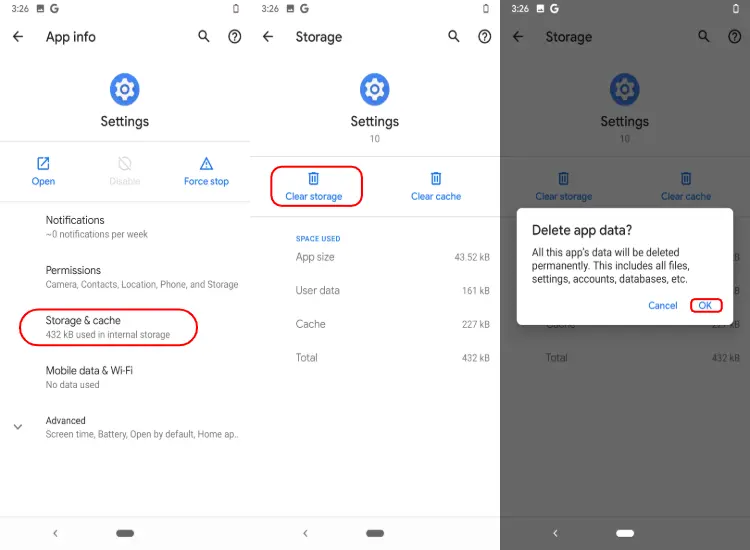
This marks the end of the process to disable developer options.
Top 5 reasons to enable developer options
While there’s a lot of developer settings that you can tamper with, here are some of the top reasons to enable developer options on your Android device:
1. Unlocking bootloader, installing a custom recovery and custom ROMs
The most common reason that people enable developer options is to toggle on the “Allow OEM Unlock” setting. You can toggle it on to be able to unlock the bootloader of your Android in order to install a custom recovery. Once you’re unlocked and have a custom recovery mode installed, the possibilities are infinite (provided your device has a healthy custom development scene). You can begin installing custom ROMs, custom kernels, and mods right away.
Moreover, we have a complete list of best android custom ROMs that you can choose, check list now!
2. Speeding up device animations
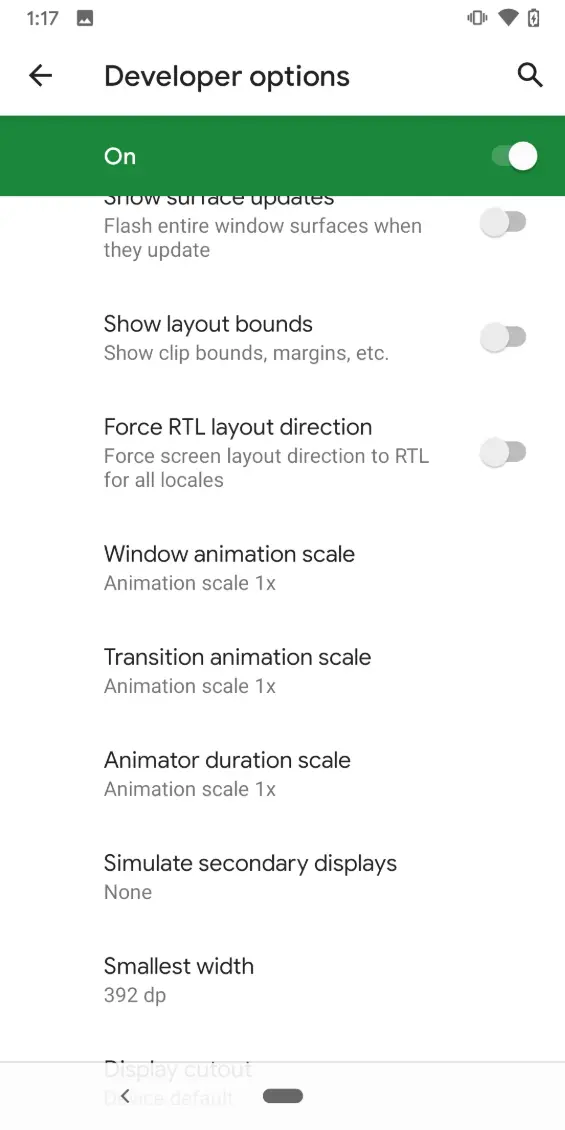
Developer options in Android house various animation settings. You can tamper with Window animation scale, Transition animation scale, and Animator duration scale. By changing the respectove settings’ values, you can alter the animation speed of your device.
Window animation settings control the animation speed with which your apps open or close from your launcher. Likewise, transition animation controls the time which the animation takes place. You can reduce these values to shorten the animation duration and increase the speed to make your Android faster.
3. Fake your device location
The Android developer mode has a setting called “Select mock location app” that lets you use third-party apps to spoof your device’s location. You can set up any third-party app while this setting is enabled to let someone know you’re elsewhere.
4. Increase performance on games
If you have a high-end smartphone, you can ramp up the processing power of your phone’s GPU to get a tad bit of boost in games. To do so, enable the “Force 4x MSAA” (multi-sampling anti-aliasing) option.
Although, use the setting with caution as your android phone will use more resources. As a result, it will take a toll on your battery as well. All the better performance, smoother graphics will drain your battery quicker.
5. Extracting bug reports
Say, you’re on a custom ROM and the system OS has bugs. You can easily visit the developer options and use the “Take bug report” option. The said option will display the system log files of your device that you can share and view.
The aforementioned option is useful to capture bug reports to debug any issues with the OS.
Things you can do in Android Developer options
Here are many other interesting system features in Android developer option–
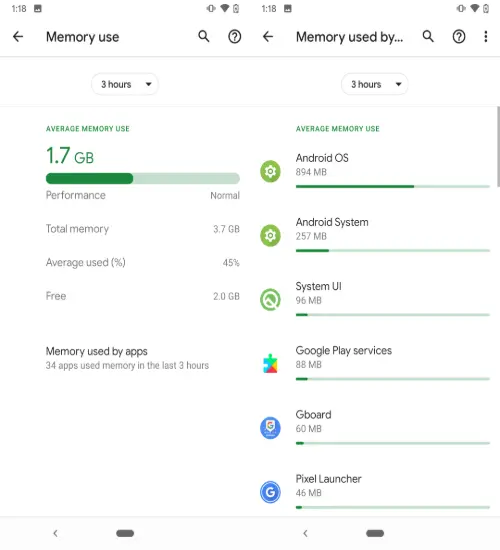
1. Memory usage
To see the average memory use of the Android system as well as other apps. You can use this tool to find out memory-hogging applications.
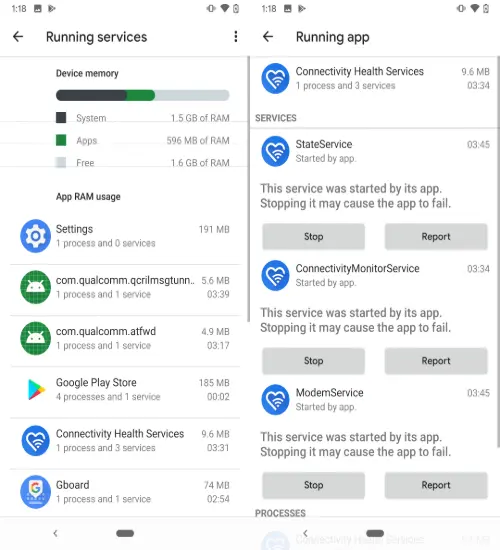
2. Running Services
Not only do you see the memory/ CPU usage of an app at this very moment, but you can also stop the application right there.
3. Reduce Animations
A popular Android tweak to throttle the animations of your Android device, thereby, improving the performance of the Android device.
4. Theme related tweaks
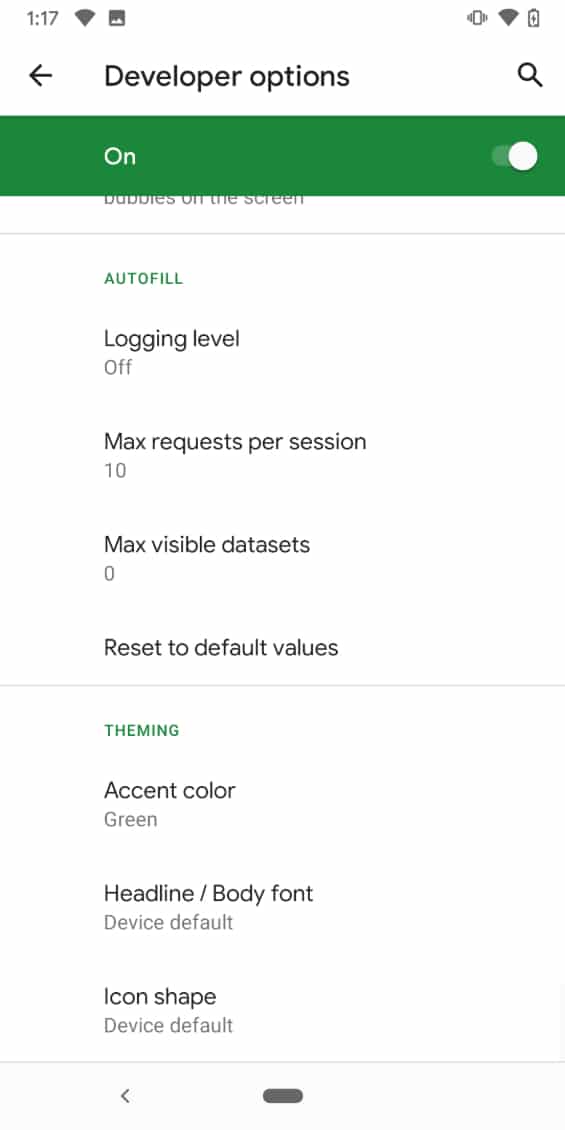
Starting with Android 10, you can change accent color as well as Icon shape in the developer settings.
Also Read: 9 Best Ways To Reduce Your Mobile Internet Data Usage On Android
Frequently Asked Questions
Developer options are usually for advanced users. You can enable them if you’re looking out to tweak the advanced settings of your device.
It’s not entirely safe to tamper with developer options if you don’t know what they mean.
Enabling developer mode only unlocks some extra device settings useful for advanced users and developers.

