How To Take Screenshot In Linux? — 5 Best Linux Screenshot Tools
One of the most common things that we do on our computers is taking screenshots. Be it important info on your screen that you’ll later forget or be it a hilarious meme, the captured screenshot images could prove to be really useful.
We all know how easy it is to take screenshots in Windows, but how easy is it on Linux? In this article, let’s look at how to take a screenshot on Linux. Apart from that, we’ll also be looking at the ten best screenshot tools for Linux if you don’t like the default method. Let’s get started.
How To Take A Screenshot In Linux?
The default method of capturing your screen on Linux is by pressing the PS or PrtScn (Print Screen) key. You’ll find it at the left of your Num pad. The PrtScn captures the entire desktop and saves the screenshots in the Pictures directory.
That’s not it. Using some of the key combinations, you can choose to capture an active app window, copy the screenshot to your clipboard, and much more. Here are all the key bindings that you must know.
| Key combination | Explanation |
|---|---|
| Ctrl + PrtScn | Copies the Screenshot to the clipboard |
| Shift + PrtScn | Allows you to select and capture a region and saves it to Pictures |
| Alt + PrtScn | Saves a screenshot of the active window to the Pictures folder |
| Shift + Ctrl + PrtScn | Allows you to select and capture a region and copies it to the clipboard. |
| PrtScn | Captures the entire screen and saves it to the Pictures folder |
| Ctrl + Alt + PrtScn | Copies the screenshot of the active app window to the clipboard |
Pretty easy, right? If you’ve recently moved from Windows to Linux, these shortcuts should come in handy.
One of the major cons of this method is, you cannot edit the screenshots and add elements like arrows, blur, shapes, and resize the screenshots. Hence, here are some of the best Linux screenshot tools that you can use to edit your screenshots on the go.
The tools on this list are not numbered in terms of how good they are. Every tool has at least one special feature that makes it different from the other.
Best Linux Screenshot Tools
1. Ksnip
Now, if you’ve been using Linux for a long time, you might think Ksnip is a part of the KDE ecosystem. It’s not. Ksnip is a completely free-to-use, open-source screenshot tool with a respectable number of built-in features like annotations, shapes, blur/pixel blur, and many more.
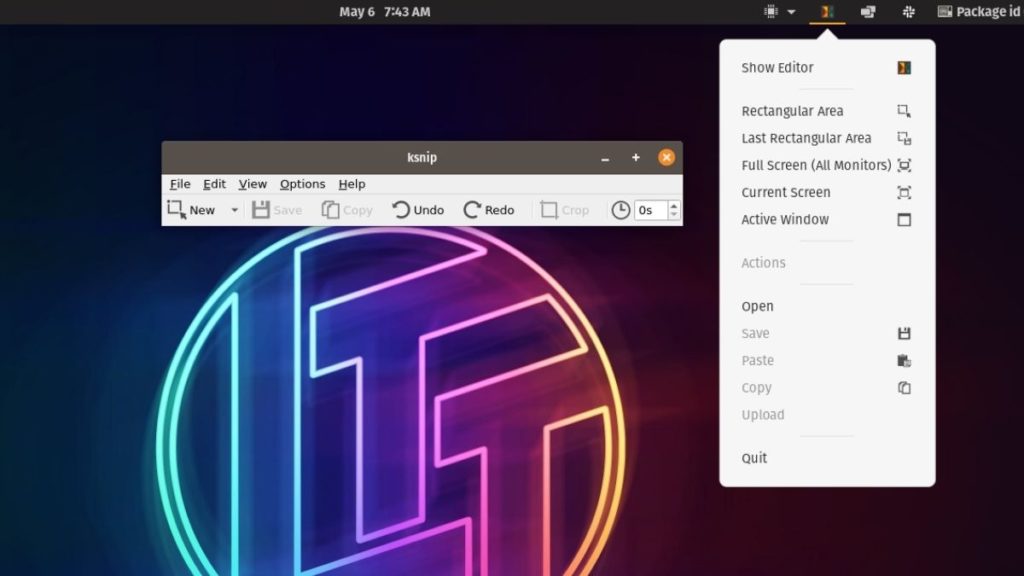
All you need to do to take a screenshot is open the app, click on new, drag and drop with your mouse to select an area, and save the screenshot or copy it to your clipboard. Once you open the app, you’ll also have the app shortcut in the tray using which you can quickly capture your screen or a portion of your screen. Overall, it’s a pretty well-designed Linux screenshot tool.
How To Install Ksnip?
You can install Ksnip on Ubuntu/Ubuntu-based distros using the built-in software center or the following command. Apart from that, you can also download the .deb and .rpm packages from the official GitHub releases page.
sudo apt-get install ksnipKsnip is also available on the Snap store.
2. Flameshot
Flameshot is an open-source screenshot tool that I personally use because of how quickly you can take screenshots with it. Apart from being quick and easy to use, it also has a fairly good amount of features that can come in handy.
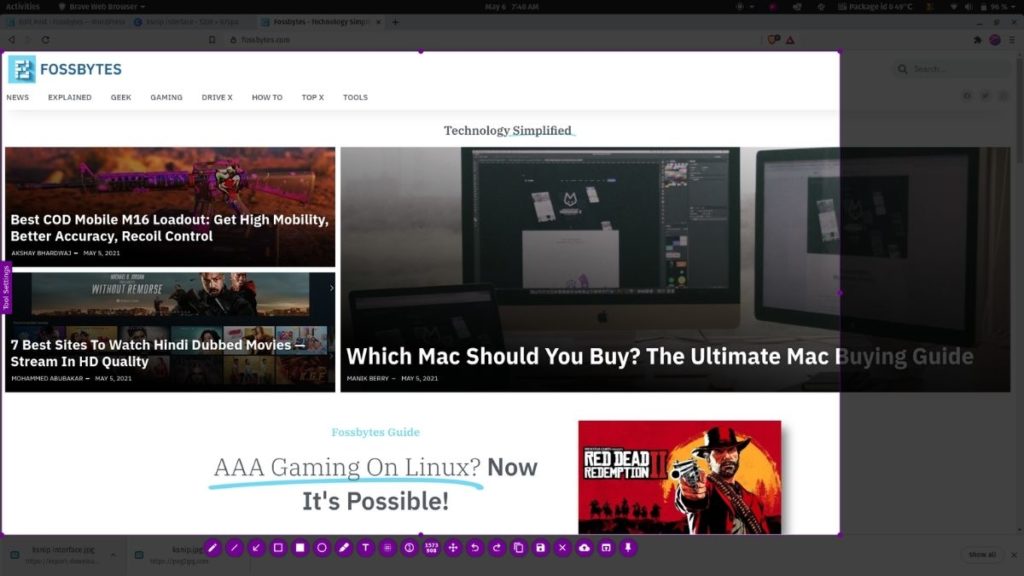
Some of the great features that I use daily are moving the selection area, adding annotations (arrows), blurring, pinning the image to the desktop, adding text, etc. Besides that, it is also available on Windows and macOS. The .deb, .rpm, .image, and .msi files can be downloaded from the official Flameshot GitHub releases page.
Speaking of pages, did you know that you can take a scrolling screenshot on Firefox Quantum’s web pages? Read our article to know more.
How To Install Flameshot?
Flameshot can be installed using the following command.
sudo apt-get install flameshotIt should also be available in the Software Centre and Snap Store.
3. GNOME Screenshot
GNOME screenshot isn’t the most feature-rich screenshot app out there, but it comes pre-installed in most GNOME-powered distros and is very easy to use.
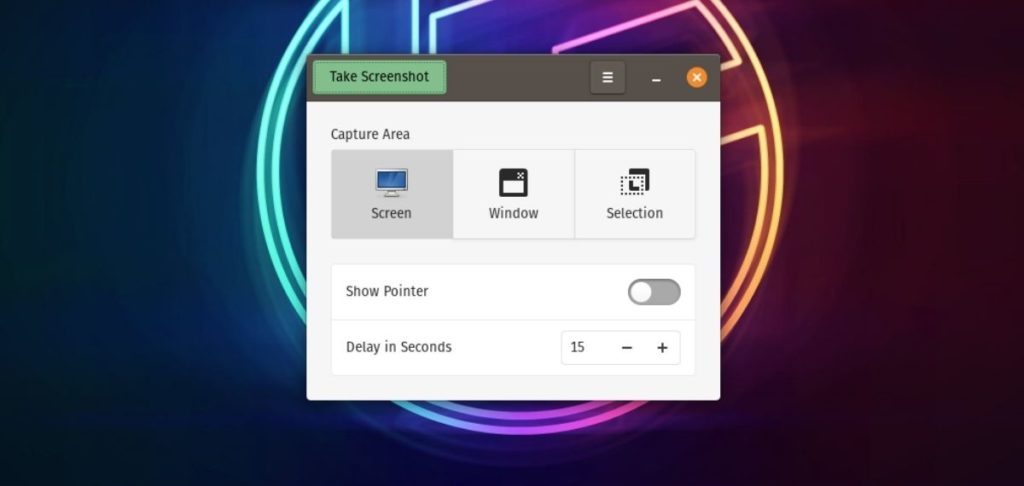
As I said, you don’t get a lot of features, but what you do get is the ability to delay screenshots which could be super useful if you want to take a screenshot of, say, the activities menu, which closes as soon you click on the “Take screenshot” option. Set the timer, select the area or the Window, and click on the “Take screenshot” button. It’s that simple.
How To Install GNOME Screenshot?
To install GNOME Screenshot, open the terminal, type the following command, and hit enter.
sudo apt install gnome-screenshot4. HotShots
One of the things that I hate about the above tools is, you can save the screenshots only in .png format, but in HotShots, you can save screenshots in different formats. There are around twenty image formats to choose from, including JPG, WEBP, and SVG.
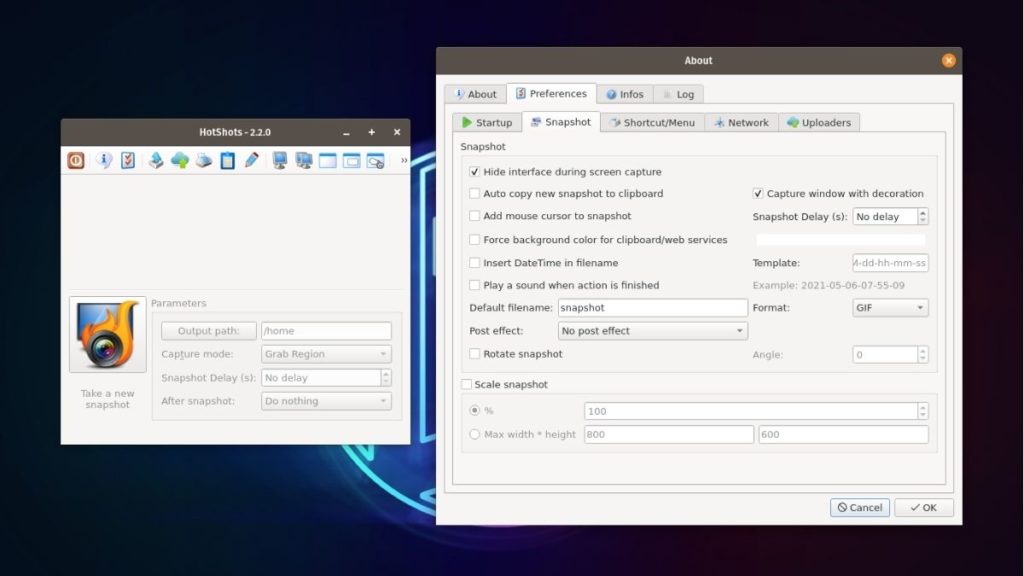
You also get a decent number of features like adding shapes, lines, text, colors, changing foreground and background colors, adding another image at the top, and many more. The interface of the editor gives MS Paint vibes. Overall, HotShots is easily my second favorite Linux screenshot tool on this list.
How To Install HotShots
To install HotShots, you need to install flatpak first and then type the following command.
sudo apt install flatpak
sudo flatpak install hotshots
5. Deepin Screenshot Tool
Deepin is a prominent name in the Linux distro market thanks to DDE (Deepin Desktop Environment). Deepin Screenshot tool is the default screenshot tool included in the DDE. It is a fundamental and simple tool with a limited number of features, mainly focusing on ease of use.

Although it’s deprecated, basic editing features like adding text, colors, and shapes are present. Apart from that, you can also select the quality you want to save the screenshot in, and last but not least, you also get an option in the editor to save the screenshot in a specific folder.
How To Install Deeping Screenshot?
sudo apt install deepin-screenshotIt is also available in the Ubuntu Software Centre.
Mapping Apps To Key Shortcuts On Ubuntu
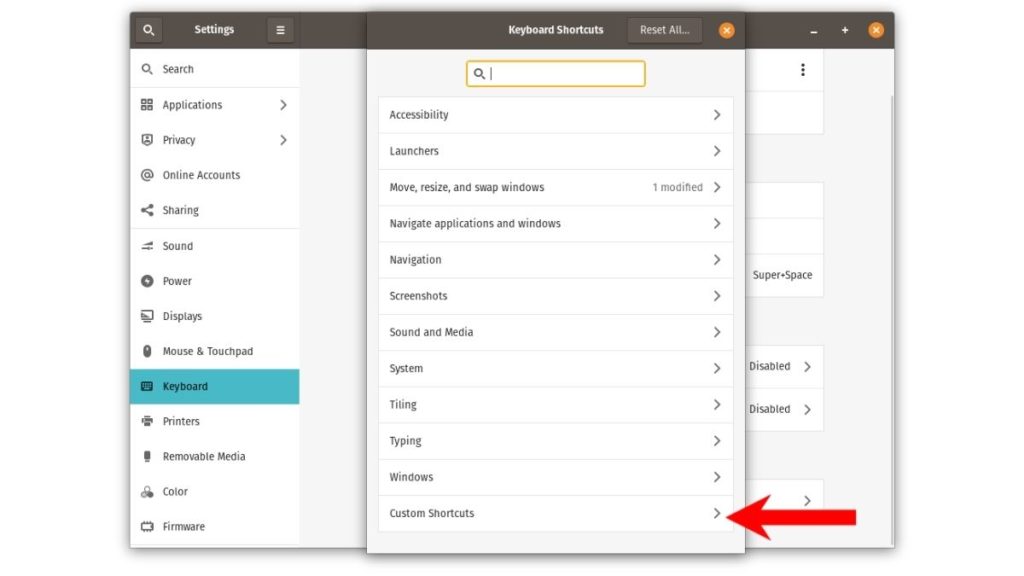
One of the easiest ways to access these Linux screenshot apps is by using custom keyboard shortcuts. For starters, GNOME allows you to add custom shortcut key combinations and map them to open applications. To start creating custom shortcuts, all you need to do is.
1. Open Settings and find the Keyboard option on the left menu.
2. Scroll all the way down to find Customize Shortcuts.
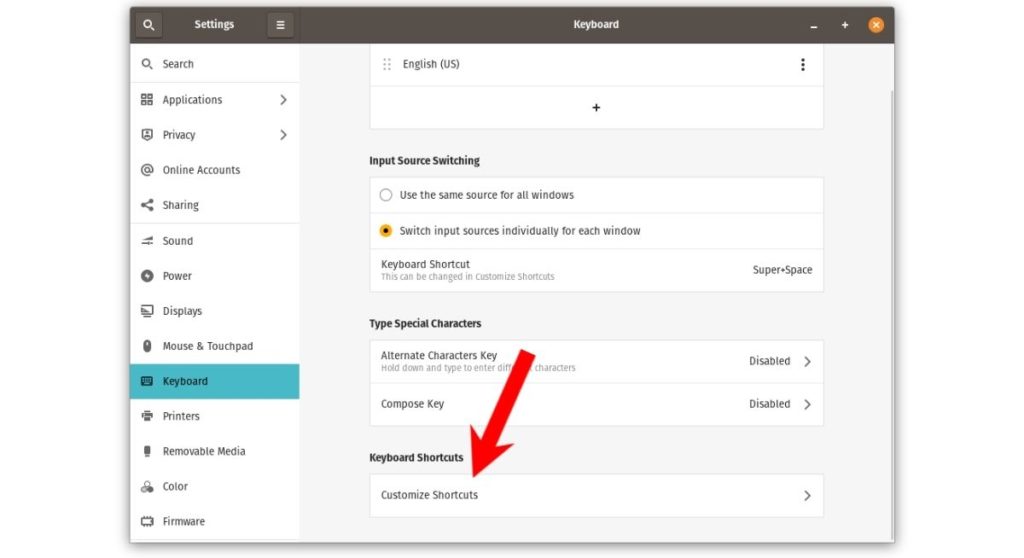
3. In a new sub-window that opens, at the bottom, find and click on the Custom shortcuts.
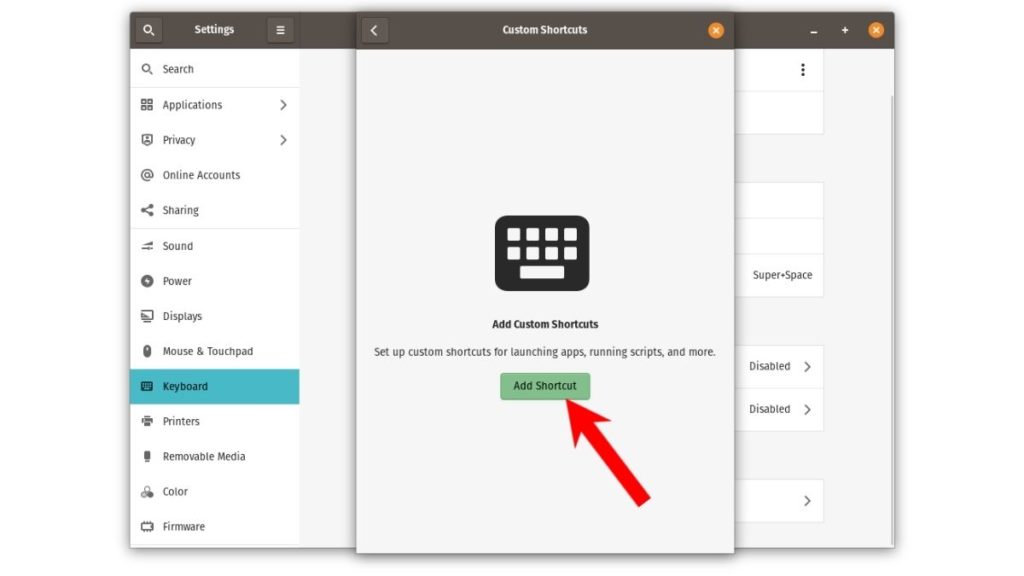
4. Now, click on the Add Shortcut button.
5. In the new window that appears, type the name, the command, and the key combination. For example, if I want to open Ksnip, this is what the values would look like.
Name: Ksnip
Command: ksnip //terminal command
Shortcut: Press and hold any two or more keys. I'll set it to Ctrl + K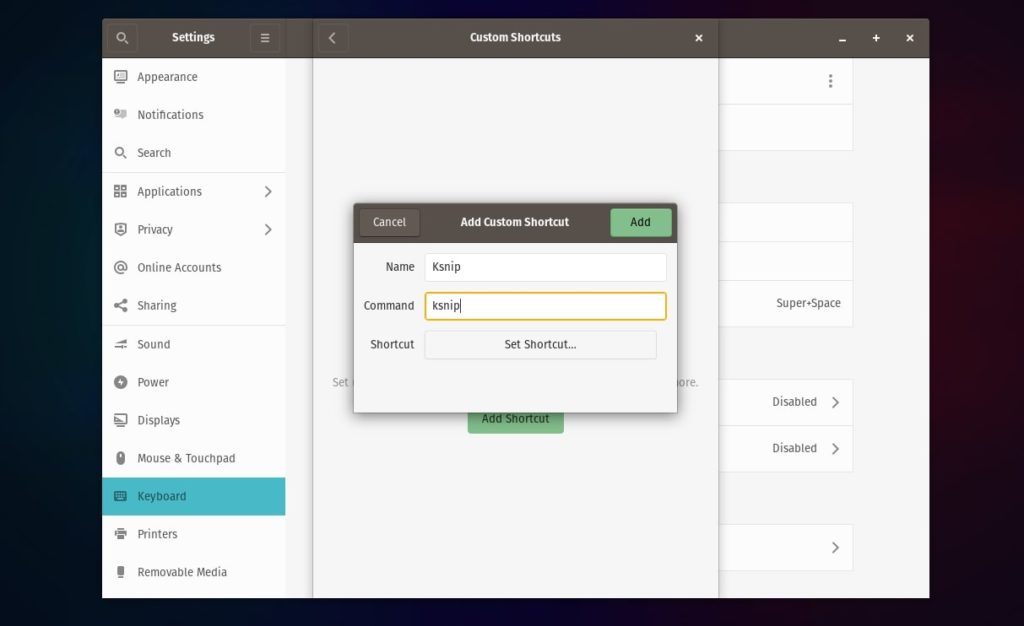
So, these were some of the best tools to take screenshots on Linux. Personally, I think Flameshot and HotShots are great, but you may go ahead with the other ones depending on your taste.
If you’re on Windows and don’t know how to take a screenshot, make sure to check out our how to take a screenshot on Windows 10 article. Besides, we’ve also included some of the best screenshot tools on Windows in the same so, make sure to check it out.
Best Linux Screenshot Tools: FAQs
Microsoft’s Snipping Tool isn’t available for Linux, but you can use alternatives like Flameshot and the GNOME screenshot utility instead as they’re quite similar to Snipping Tool.
The screenshots you take using the Printscreen key are saved in the Pictures directory.
PrtScn stands for “Print Screen,” which, as the name suggests, is used to take screenshots on both Windows and Linux. Press the PrtScn key, and a screengrab of the entire window will be stored in the Pictures folder in Linux or the Screenshots folder in Windows.
Did we miss any screenshot tools that deserve to be on this list? Do leave your feedback and suggestions in the comments section below.

