How To Disable Windows 10 Forced Updates – 5 Different Methods
Each week we are presented with new numbers that claim that more and more users are hopping up on the Windows 10 train. This was possible due to the simple and smooth upgrade process by Microsoft. If you still haven’t got Windows 10 upgrade, you can refer to our simple and helpful Windows 10 upgrade tutorial.
However, controversies were bound to come into the limelight amid all the new features and a smooth upgrade. It’s a long list- starting from forced updates to shadowy privacy policies. Redmond fiddled with the idea of Windows 10 forcing updates to make the Operating System more stable and efficient. Windows 10 Pro users have the option to delay Windows 10 forced updates, but if you are using Windows 10 Home, you can’t do much about it.
However, great in intentions, the updates don’t work out this way and have caused problems to the users.
So, the question remains: How do we disable Windows 10 forced updates?
In this guide, we tell you the answer to this question with five effective methods. These methods to disable forced Windows 10 updates give you more control as a user.
Ways To Disable Windows 10 Forced Updates
- 1. Mark your WiFi Connection as “Metered”
- 2. Disable Automatic Updates From Settings
- 3. Change Device Installation Settings to Stop Automatic Driver Updates
- 4. Stop the Windows 10 Update Service From Starting Automatically
- 5. Disable Automatic Updates Using Local Group Policy Editor
- Honorable Mention: Windows 10 Update Disable Tool
- FAQs
1. Mark your WiFi Connection as “Metered”
I’ve already written about this method in detail in a previous article. Visit this link to disable Windows 10 forced updates by marking your WiFi connection as metered.
2. Disable Automatic Updates From Settings
For those who want to prevent downloading updates for a short time, there’s a way to temporarily disable Windows Update. Using this method, you can stall an update for up to 35 days on Windows 10 Home and Pro editions. Just go through these steps:
- Hit the Windows button + “I” simultaneously to open “Settings.”
- Click on “Update & Security.”
- In “Windows Update,” click on “Advanced Options.”
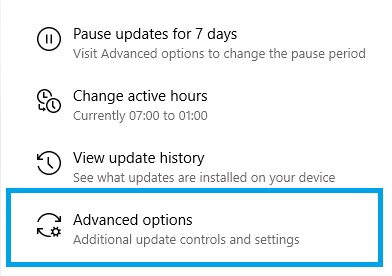
4. Scroll down to “Pause updates” and select your preferred date from the dropdown menu under “Pause until.”

3. Change Device Installation Settings to Stop Automatic Driver Updates
Windows 10 proactively checks the latest drivers for your hardware and automatically downloads them. If you want to change this default behavior, you can change the Device Installation Settings and stop Windows from updating your drivers by itself. Here’s how to do this:
- Press the Windows button and “R” simultaneously to open Run. Then, type in “control” and hit enter.
- Select “System” in the All Control Panel Items window.
- Click on “Advanced System Settings.”
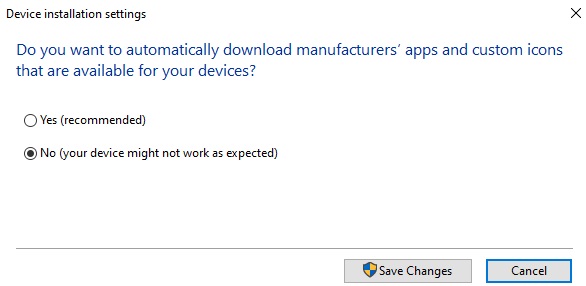
- Select the Hardware tab and click “Device Installation Settings.”
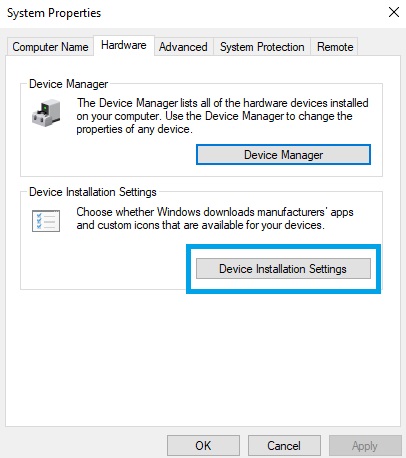
4. Choose “No (your device might not work as expected),” click on “Save Changes,” and confirm your decision.
4. Stop the Windows 10 Update Service From Starting Automatically
In reality, Windows 10 updates are just another Windows process. You can stop this process using these simple steps:
1. To make changes in startup to disable Windows 10 forced updates, open the Run command by pressing Windows + R. Now, type “services.msc” and press “Enter.”
2. Now, in the list of processes, locate the “Windows Update” service and open it by clicking.
3. To disable it, under the “General” tab, find “Startup Type” and change it to “Disable.”
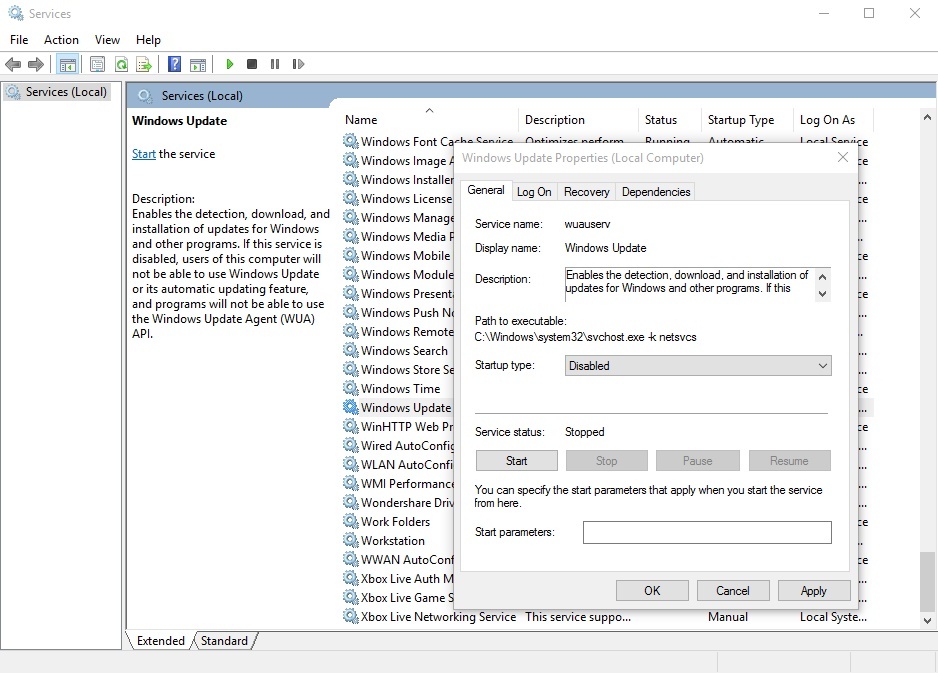
4. Now restart your Windows 10 PC to disable Windows 10 forced updates.
To restart the Windows Update Service in Windows 10, follow these steps and change the “Startup Type” to “Automatic.”
5. Disable Automatic Updates Using Local Group Policy Editor
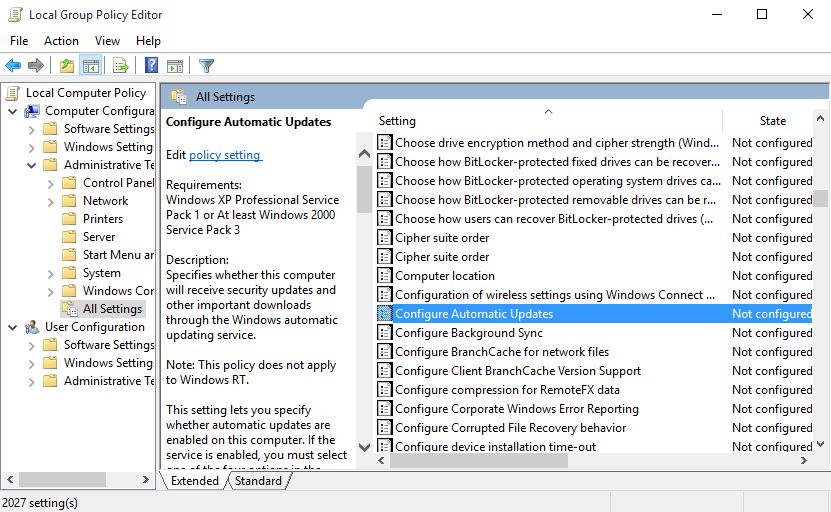
The option to disable Windows 10 forced updates is invisible by default. However, you can tweak a few settings in the “Group Policy Editor” to re-enable the pleasant option to stop your computer from downloading updates from Microsoft.
(Windows 10 Home users can’t use these advanced options as it is only for Preview builds of Windows 10 Education, Pro, and Enterprise editions.)
Follow these simple steps to make the hidden settings visible and disable Windows forced updates:
1. In the Windows 10 desktop search, type “Group Policy Editor” and open the tool.
2. Find the “Computer Configuration” and click on the “Administrative Templates” folder to expand it.
3. Now select “All Settings” and find the “Configure Automatic Updates” entry in the new window.
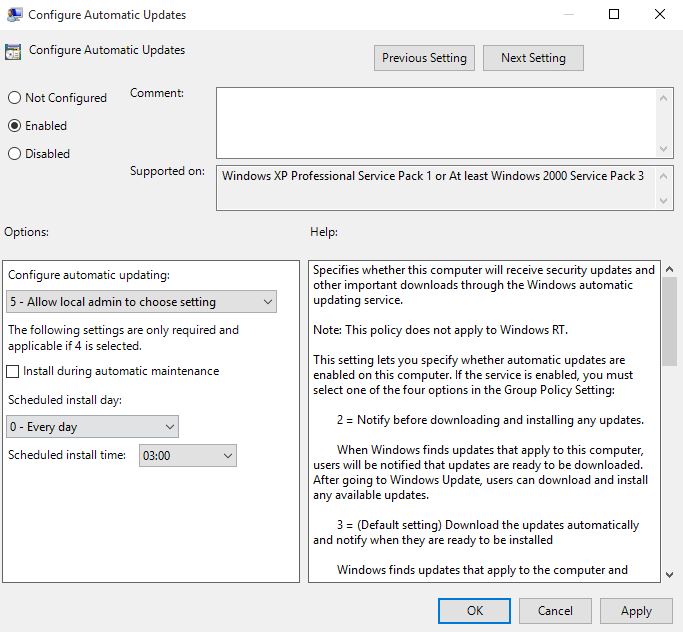
4. Double-click on it and enable it by choosing the “Enable” button located at the top left.
5. After this step, you’ll also be able to change the “Options” located at the bottom. From the drop bar, choose the option that says “Allow local admin to choose settings” to disable Windows 10 updates.
The option for disabling the automatic update download is now “enabled” in Control Panel. Follow the steps below to enable this option:
- To disable Windows 10 forced updates, go to “Control Panel” and select “System and Security.”
- Here, click on “Windows Update” and select “Change settings.”
- Here, you can see the option that “Check for updates but let me choose whether to download and install updates.”
- Select this option and now your Windows 10 PC will check for updates, but download and install them only after your permission.
Honorable Mention: Windows 10 Update Disable Tool
For Windows users who want a quick way to disable the updates, third-party apps truncate the manual process. Certain programs even give you one-click access to toggle the status of Windows Update.
Some popular Windows 10 update disable tools are Windows Update Blocker, Win Updates Disabler, Kill-Update, Win Update Stop, StopUpdates10, Wu10Man, etc.
Going by how easy the description makes it sound, you might think using an update disable tool should’ve been the first thing on this list. But, keep in mind that such tools are not produced by reputed sources and, hence, carry a risk. As a result, we recommend you go for other methods instead of installing a program for disabling Windows Update.
Moreover, if you are no stranger to using Command Prompt, you can also prevent forced updates by using some commands. Here’s our guide on 3 simple commands to disable forced Windows 10 updates.
Did you find this tutorial helpful? Tell us in the comments below.
FAQs
You can permanently disable Windows 10 Home updates by going to Microsoft Store, accessing your profile, and disabling the Windows Updates toggle.
Over the years, quite a few people have filed lawsuits against Microsoft for forcefully installing updates and rendering their PC useless in the meantime. However, the company has since changed its policy to give you ample time before Windows installs the compulsory updates. So, a lawsuit now is less likely to get you any compensation.
To cancel the restart notification after an update, you can hit the Windows button and “I” together to open “Settings,” then click on “Advanced Options,” and turn off the toggle under “Update notifications.”

