Fire Up The New Windows Subsystem For Linux In Windows 11: Here’s How

Microsoft announced Windows 11 on June 24. The software giant subsequently released the OS to members of the Windows Insider program, and it can currently be tested by those enrolled in the Dev and Beta channels. While many welcomed the new UI changes, some were still skeptical of several inconsistencies that continue to plague Windows in general.
However, one neat feature of Windows 11 is the improved Windows Subsystem for Linux (WSL), which can now handle graphics and audio natively. In this article, we take a look at what’s new in WSL in Windows 11 and how to get started with it.
What is the Windows Subsystem for Linux
More often than not, developers find themselves switching between the familiar interface of Windows and the ease of command line-based development toolchains in Linux. Also, those who deal with large data find a good number of open source tools natively developed for Linux. The Windows Subsystem for Linux, or WSL for short, enables developers to continue using Windows as their primary OS while giving access to native Linux binaries.
Users, therefore, don’t have to worry about the emulation overhead of running virtual machines or take the pains of configuring a dual-boot setup. While Cygwin does provide a POSIX compatibility layer for running Unix-like commands, it requires recompilation of those commands and as such has limited applicability. With WSL, Windows users can directly invoke the Linux shell just like any other program and run native Linux binaries.
Starting with Windows 10 1903, Microsoft introduced a new version of WSL called WSL 2 that offers tighter integration with the Windows filesystem, fast boot times, faster disk reads, and a fully functioning Linux kernel. Now with Windows 11, Microsoft is even adding GUI and real-time audio support.
Installing WSL in Windows 11
Installing the Windows Subsystem for Linux requires some prerequisites to be taken care of. Since WSL 2 uses an actual virtual machine, your CPU needs to support virtualization. While this shouldn’t be a problem with most modern CPUs from Intel and AMD powering desktops and laptops, this feature is generally turned off in the BIOS/UEFI of the computer.
Boot into the BIOS/UEFI interface of your PC (usually, this involves pressing DEL or F2 key during power-on; refer to your computer’s user guide for more information). Once inside the BIOS, search for Intel Virtualization Technology or AMD Secure Virtual Machine (also indicated as SVM) depending on your CPU and enable it. Save changes and restart the PC.
Upgrading from WSL 1 to WSL 2
Unless you are upgrading from a previous version of Windows with WSL 1, WSL 2 is used by default in all recent versions of Windows 10 (1903 and above) and Windows 11. Using the new GUI, audio, and filesystem enhancements requires a mandatory upgrade to WSL 2.
Follow the steps mentioned below to perform an in-place upgrade from WSL 1 to WSL 2:
1. Type the following in an elevated command prompt, Windows Terminal, or PowerShell.
wsl --set-version <distro-name> 22. Make sure to enter the exact name of the distro. If in doubt, just type:
wsl -l -v 3. This command lists the installed Linux distros, their current state, and the WSL version they are using. Use the name listed here in the previous command to convert a WSL 1 instance to WSL 2.
Enabling WSL in Windows 11
If this is the first time you are using WSL on Windows 11, you will be automatically offered a WSL 2 environment. All you need to do is to ensure CPU virtualization is enabled in the BIOS and WSL features are installed in your environment.
1. To enable WSL, click on the Start button.
2. Type “Turn Windows features on or off”, and in the dialog box enable Windows Subsystem for Linux, Windows Hypervisor Platform, and Virtual Machine Platform.
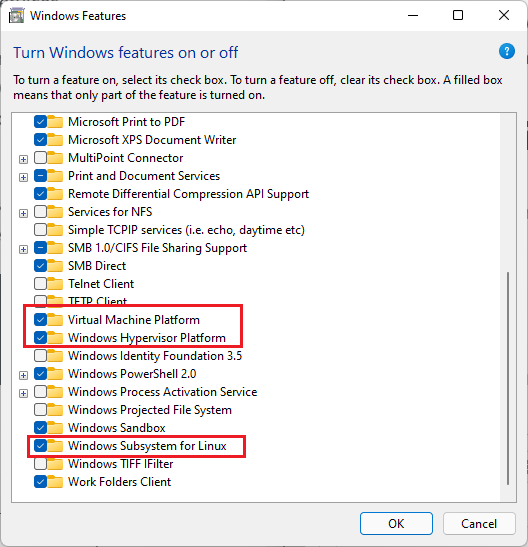
3. Click on Ok and restart the PC.
The best part about WSL 2 is that most kernel-level features are directly supplied by Windows Update. Your PC may automatically offer the WSL 2 kernel update. If not, just go to the Settings app, click on Windows Update, and click Check for updates to download the latest kernel that enables WSLg (short for WSL GUI) functionality.
At this point, note that you need to have the latest graphics drivers from Intel, NVIDIA, or AMD depending on your primary GPU adapter in order to get full GPU acceleration. You can use the beta drivers for your corresponding GPU or just install the latest public versions. Now that the prerequisites are taken care of, you are all set to install a Linux distro on your Windows 11 machine.
Installing a Linux distro in WSL 2 on Windows 11
The easiest way to get Linux up and running on Windows 11 is to just go to the Microsoft Store and search for a distro of your choice. Currently available options include Ubuntu (16.04, 18.04, and 20.04), Kali Linux, SUSE Linux Enterprise Server, openSUSE leap, Fedora Remix for WSL, and Debian.
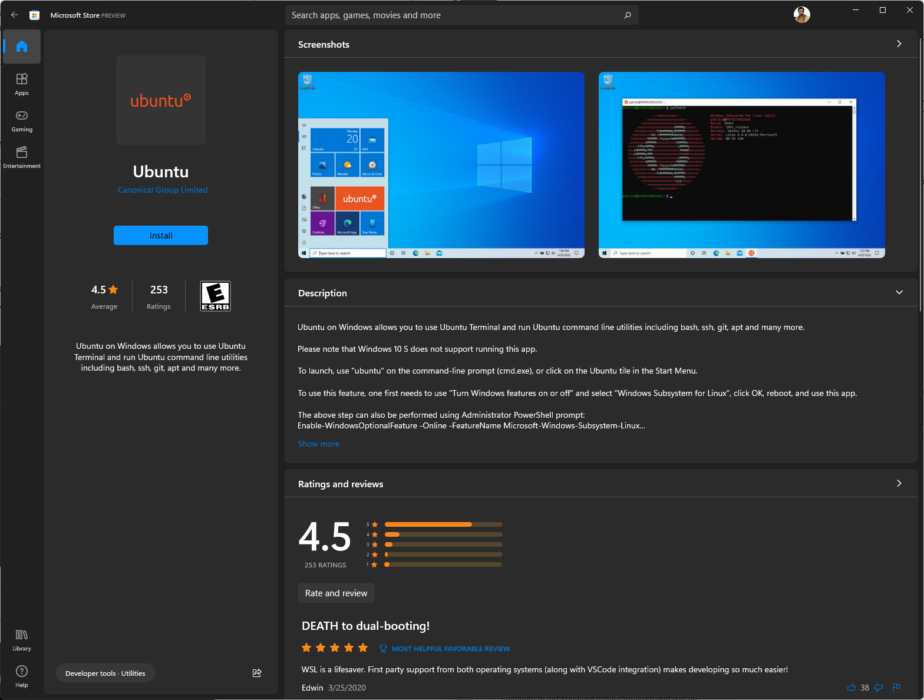
While the Microsoft Store allows for easy download and installation of these distros, the choices are currently limited. However, with WSL 2, it is possible to create and sideload your own distribution by obtaining the corresponding .tar file. For this article, we will use Ubuntu since it is very popular and there are excellent resources available online if you ever get stuck at a particular command or operation.
Some organizations or domain-joined PCs may have limited access to the Microsoft Store. In such cases, you can directly download the install packages from Microsoft. Follow the steps below to install the distro:
1. You can double-click the installer or use the below PowerShell command from the installer folder.
Add-AppxPackage .\distro_name.appx2. Once your distro of choice has been installed, it should pop up instantly on the Start Menu.
3. Just click on the icon to start an installation instance of Ubuntu.
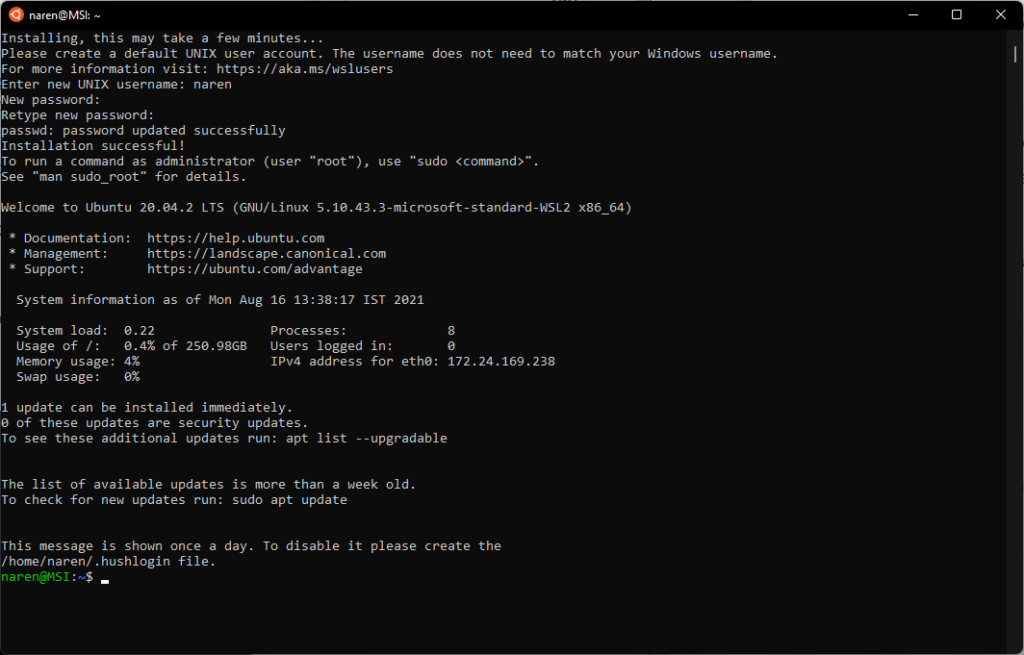
4. After a few seconds, you will be prompted to create a user account and password. If for some reason, the installer does not prompt you for a user account or password, it will directly log you in as root.
Remember that operating with root privileges is a bad security practice. There is no root password assigned by default, which makes it all the more vulnerable. It always helps to first assign a root password and then create a regular user account. Here’s how you can do it:
1. To assign a new root password, use the command:
sudo passwd root2. Next, enter and confirm the new root password. Be sure to note it down safely. To create a regular user account, which can then be used for root access as and when needed, type:
sudo adduser <username>3. Ubuntu will then ask to enter and confirm your password along with some other information such as your Full Name and Phone (this is optional).
4. This creates your dedicated /home directory and shows your username with a $ sign at the bash shell prompt.
The WSL 2 Ubuntu instance is now ready for use.
Update your WSL apps
At this point, we are done with installing Ubuntu and creating a user account and password. Before going on to further steps, it helps to do a quick update check and install the latest packages available for your distro version.
This ensures all your inbox packages are up to date and that you are using the latest features and security improvements. Follow the steps:
1. Enter the following commands to fetch new versions:
sudo apt-get update

sudo apt-get upgrade
2. At the bash prompt, the first time you run sudo, it asks you to enter your password, which should be valid for at least 15 minutes to run successive sudo commands.
Do note that apt-get upgrade will only refer to the repositories defined in /etc/apt/sources/list or /etc/apt/sources.list.d/ and upgrades accordingly.
3. For a more seamless update process, also run:
sudo apt-get dist-upgradeThis command can intelligently add or remove packages to ensure there are no redundancies in the system.
Check and upgrade Linux distro version
Generally, the Microsoft Store offers the latest long-term service (LTS) version of Ubuntu by default. It is recommended to use the LTS versions for maximum stability. You can check for new OS versions by running:
sudo do-release-upgradeHowever, ensure that the existing installation is up to date by first running the update and upgrade commands as described above. You can check your OS version by typing:
lsb_release -a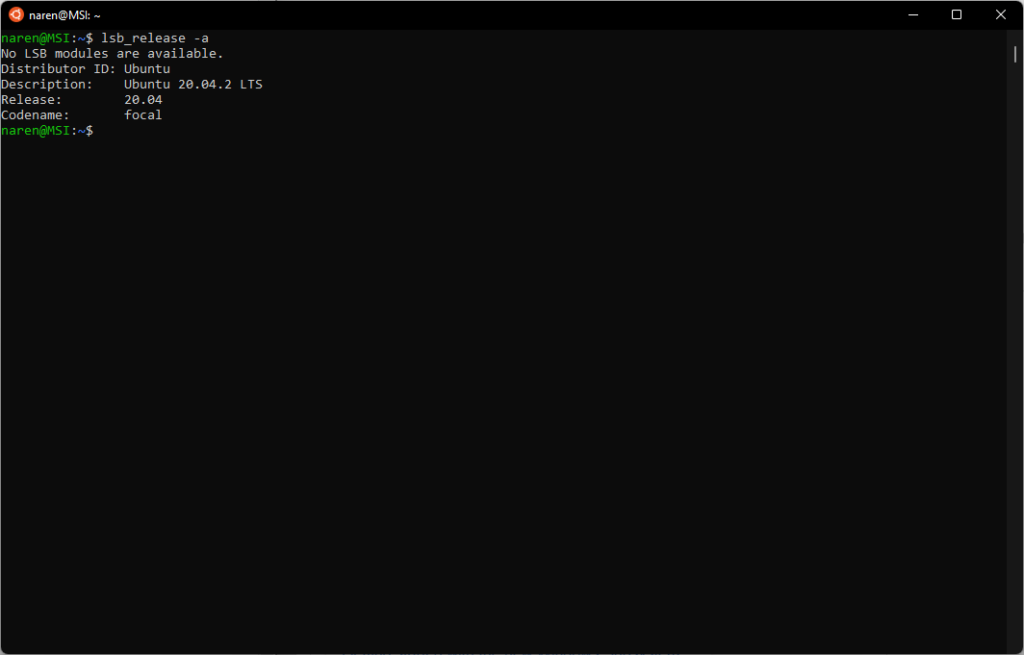
Do note that you can also get more information about any command by typing:
man <command name>Accessing Linux files in Windows 11 and vice-versa
Now that we have successfully installed and configured Ubuntu in Windows 11’s WSL 2, it helps to know how to seamlessly move between Linux and Windows files. In Linux, NTFS and other file systems can be mounted onto a dedicated mount directory.
One neat approach with WSL is that you can directly invoke a Linux terminal from a Windows folder and have the folder already mounted for you. This is made possible via a filesystem plugin called DrvFs that WSL uses to enable interop between the Linux instance and the Windows filesystem.
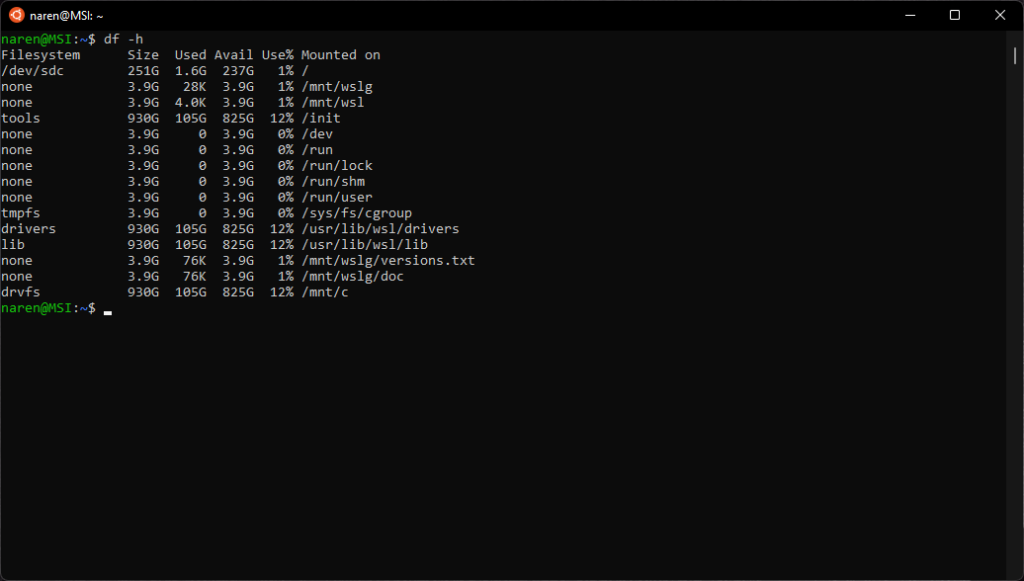
DrvFs automounts fixed disks such as HDDs and SSDs and makes them available for immediate use. The C drive is mounted on /mnt/c, D drive on /mnt/d, and so on.
1. You can verify this by running the df -h command to list all disks and their mount points. In this example, we have a single C drive, which is mounted on /mnt/c via DrvFs
2. To switch to a Windows drive onto WSL, type the following command in the command prompt and hit enter.
cd /mnt/c #substitute c with the corresponding drive letter as needed3. Just like regular Linux, you can also mount external storage devices by creating a mount point. Use the following command
sudo mkdir /media/<dir name> #where <dir name> can be any directory name you wish to mount onto.4. Then mount a drive or partition to this directory.
sudo mount /dev/<deviceID> /media/<dir name>5. To view the contents of the mounted drive, first switch to it using the command.
cd /media/<dir name>6. Lastly, list the contents using the command.
ls -lsSince the whole point of WSL is to have seamless interop between Linux and Windows, it is also possible to view Linux files directly under Windows and edit them with Windows programs.
Windows sees WSL as a PC on the network and mounts Linux as a network share to ensure file permissions are properly maintained as users switch between both operating systems. There are several ways to access WSL files from Windows.
Ways to access WSL Files from Windows
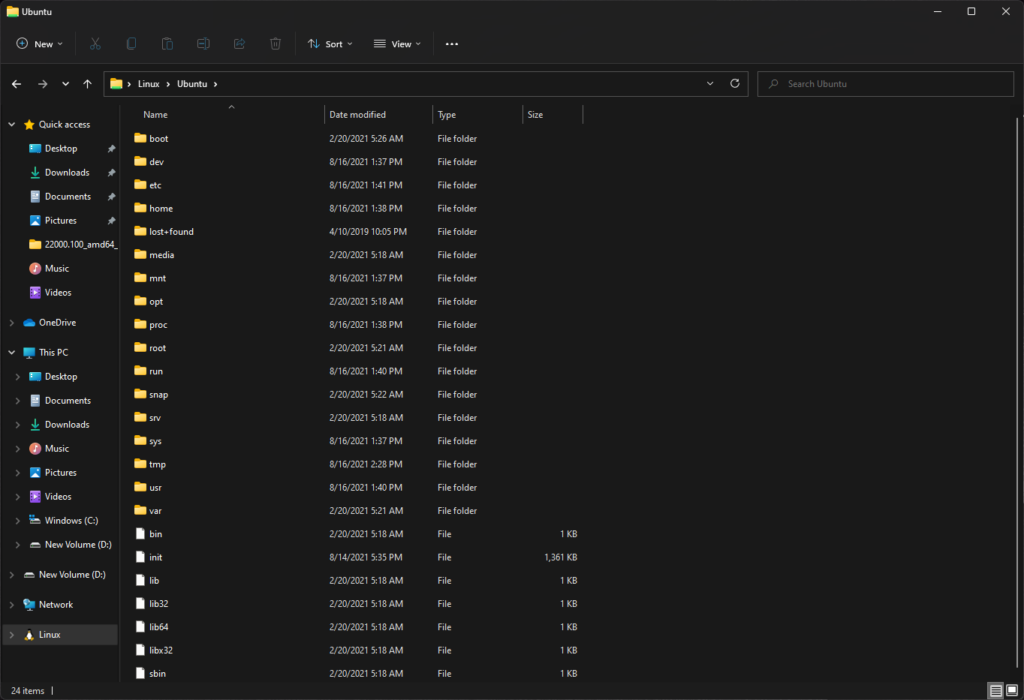
1. The easiest way is to simply look at the left-hand panel of File Explorer for an entry named “Linux”.
2. Clicking on that will list your installed distros as folders. Click the corresponding distro folder to access all Linux directories in that distro.
3. From there, you can create your own files and directories just like how you normally do in Windows.
4. The above directory listing can also be reached by typing \\wsl$ in any File Explorer or Run dialog box in Windows.
5. If endless navigation is not your cup of tea, you can also type explorer.exe from any Linux directory in WSL. This will directly open the Windows File Explorer in the current working Linux directory.
In this article, we have familiarized ourselves with WSL 2 and how to successfully install and update a Linux instance within WSL 2. We have also seen how to seamlessly navigate with filesystems across both Windows and Linux. In the upcoming articles, we will look into installing graphics and audio apps and see how well they work in WSLg in Windows 11.
If you have something to add, drop your thoughts in the comments below.