Microsoft Office On Linux Is Now A Thing, Thanks To WinApps [How-to]

Unavailability of Microsoft’s Office on Linux has almost always been one reason why most people don’t migrate to Linux from Windows. While Linux has many cool office suites like LibreOffice, people stick to Microsoft Office because they’re habituated to using the same and probably don’t have enough time to learn using LibreOffice.
What if we told you that you can now run Microsoft Office apps as if they were a part of the native OS? Developed by a Twitter user that goes by the name Fmstrat, who also developed Windows Subsystem for Linux, WinApps lets you do the same with the help of a kernel virtual machine. Think of this as Windows Subsystem on Linux.
Here’s a guide on how you can install and configure WinApps and run Windows apps on Linux. Mind you, WinApps is available only for Ubuntu/Fedora Linux and GNOME/KDE desktop environments.
Which Windows Apps Work?
Here’s a list of all the apps that work as of writing this article:
- Internet Explorer 11
- Microsoft Access (2016)
- Microsoft Access (2019)
- Microsoft Access (Office 365)
- Microsoft Excel (2016)
- Microsoft Excel (2019)
- Microsoft Excel (Office 365)
- Microsoft Word (2016)
- Microsoft Word (2019)
- Microsoft Word (Office 365)
- Microsoft OneNote (2016)
- Microsoft OneNote (2019)
- Microsoft OneNote (Office 365)
- Microsoft Outlook (2016)
- Microsoft Outlook (2019)
- Microsoft Outlook (Office 365)
- Microsoft PowerPoint (2016)
- Microsoft PowerPoint (2019)
- Microsoft PowerPoint (Office 365)
- Microsoft Publisher (2016)
- Microsoft Publisher (2019)
- Microsoft Publisher (Office 365)
End Result
Also Read, How To Install WSL2 on Windows
How To Install WinApps On Linux
1. First, we need to create a WinApps configuration file.
~/.config/winapps/winapps.config2. Enter the following information into the newly created config file.
RDP_USER="MyWindowsUser"
RDP_PASS="MyWindowsPassword"
#RDP_DOMAIN="MYDOMAIN"
#RDP_IP="192.168.123.111"
#RDP_SCALE=100
#MULTIMON="true"
#DEBUG="true"
3. Clone the WinApps git repo and install KVM and FreeRDP.
git clone https://github.com/Fmstrat/winapps.git
cd winapps
sudo apt-get install -y virt-manager freerdp2-x11
4. For Ubuntu 20.04 and above you’ll need to run KVM as a user instead of root. This can be done using AppArmor.
sudo sed -i "s/#user = "root"/user = "$(id -un)"/g" /etc/libvirt/qemu.conf
sudo sed -i "s/#group = "root"/group = "$(id -gn)"/g" /etc/libvirt/qemu.conf
sudo usermod -a -G kvm $(id -un)
sudo usermod -a -G libvirt $(id -un)
sudo systemctl restart libvirtd
sudo ln -s /etc/apparmor.d/usr.sbin.libvirtd /etc/apparmor.d/disable/

sleep 5

sudo virsh net-autostart default
sudo virsh net-start default
5. Reboot your PC. Next, we need to define a VM caled RDPWindows and we do that using the following commands.
virsh define kvm/RDPWindows.xml
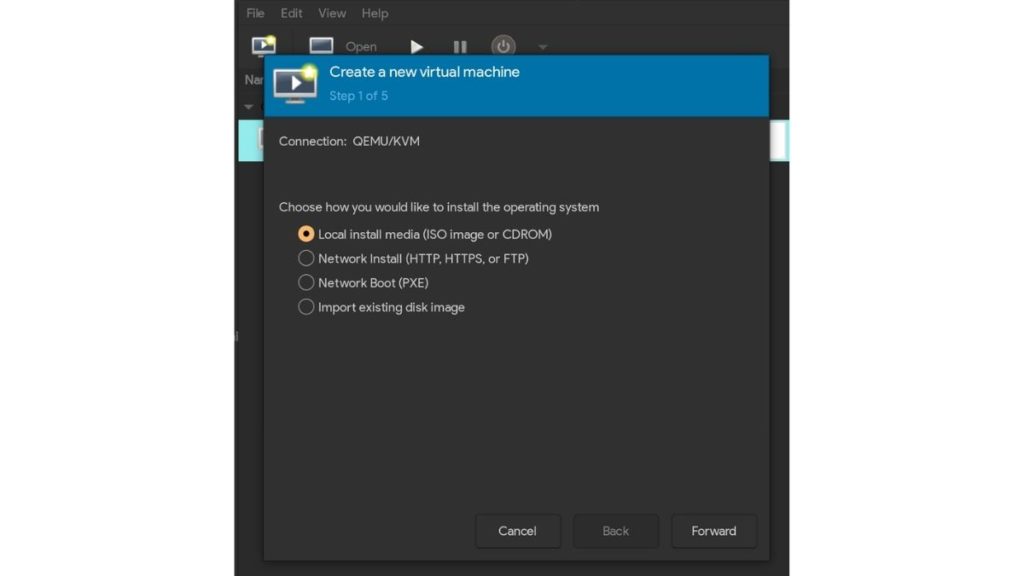
virsh autostart RDPWindows6. Install Windows on the Virtual machine. Grab the official ISO from the official Windows website.
7. After the installation’s done, you’ll need to go to the Start menu in Windows and change the PC name to “RDPWindows” for WinApps to detect the local IP address.
8. Then go to the settings and allow remote connections for RDP.
9. Copy the RDPApps.reg file from the kvm Directory and merge it into the registry on Windows to enable RDP Applications.
10. And the moment we’ve all been waiting for; Run the installer.
./install.shThat’s pretty much it! With all these amazing efforts from the Linux community, the day we’ll be able to use Adobe’s Suite on Linux is not far.
Do let us know in the comments section below if you face any issues during the installation, and we’ll try to get back to you as soon as possible.


![How To Zip A File In Windows And Mac? [Easy Steps To Zip Files]](https://fossbytes.com/wp-content/uploads/2019/08/Zip-files-in-Windows-Mac-768x410.jpg)