Linux Lexicon: Handling File and Directory Permissions In Linux

 In this tutorial of the Linux Lexicon series, we will cover the intricacies of File and Directory Permissions. We shall try to get you up to speed with the basics of Linux Permissions and Ownership, how to view and modify them, the various commands involved, and plenty more.
Since Linux is a multi-user system, it opens up the possibility of some other user accidently modifying your files or screwing up your computer system entirely. Also, optimal permissions need to be designated when it comes to crucial documents such as bootloader configuration files, system and daemon configuration files, or firewall scripts.
As such it becomes essential that one has a thorough understanding of file and directory permissions and ownership in Linux.
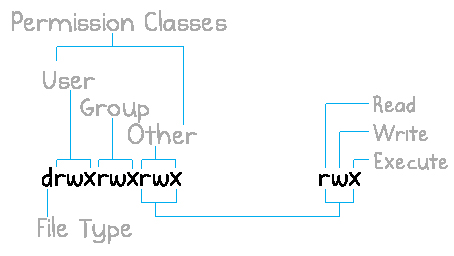
Permission Classes
For each file and directory, 3 categories/classes of users have been defined. We can define different file and directory permissions for a different category of users. These classes are:
User/Owner (u): The owner of a file/directory belongs to this class.
Group (g): The users in the file/directory’s group belong to this class.
Other (o): All other users who do not own the file/directory or are not in its group belong to this class.
Bonus Tip: One can find out about the users of the system by viewing the contents of the /etc/passwd file. The name specified before the ‘:‘ in each line of this file indicates a username. Type in the following command to find out the contents of this file:
cat /etc/passwd
One can also find out about the groups that their current user belongs to by using the ‘groups‘ command.
Types of Permission
There are three main types of file and directory permissions defined in Linux for any file or directory in Linux:
Read (r): For a file, it allows the user to read/view the contents of the file. For a directory, it allows for file names in the directory to be read.
Write (w): For a file, it allows the user to write/modify the contents of the file. For a directory, it allows for modification of entries within the directory.
Execute (x): For a file, it allows the user to execute the file. For a directory, it allows for access to contents and metadata for entries.
Viewing File and Directory Permissions & Ownership
In order to view the permissions designated to a file, we use the ls command with the long listing option. Type in:
ls -l <file/directory>

Now the first thing that we observe in the output is the string -rw-rw-r–. This indicates the permissions assigned to the file.
Here, the first character is used to indicate the file type. Depending on the character, it could mean either of the following things:
–: used to denote regular files (these are just plain files that contain data)
d: used to denote a directory
l: used to denote a symbolic link
The set of three characters/triad following the first character indicate the permissions assigned to the ‘owner‘. The next triad indicates the permissions assigned to the ‘group‘ and the one following it indicates the permissions assigned to ‘other users‘.
Also Read: 20 Quirky Things You Didn’t Know The Linux Terminal Could Do
Changing Ownership
Besides modifying the file and directory permissions granted to a user, it is also possible to change the owner of the file/directory or the group to which a file/directory belongs.
In order to change the owner of a file/directory, we use the chown command. It’s used like this:

In case you wish to modify the group to which a file/directory belongs, we use the chgrp command. It works in the following manner:

Modifying Permissions
Permissions are also known as modes in Linux. We use the chmod (short for ‘change mode’) command in order to change the file and directory permissions. It is one of the most basic commands used in Linux.The format for the chmod command is:
chmod mode <file>
The mode in the chmod command can be specified in either ‘symbolic mode‘ or ‘octal mode‘. Both of these have been discussed below.
Symbolic Mode:
The symbolic mode format for the command is:
chmod user_category operator permission
The user category could be either u (for user), g (for group), o (for others), or a (for all). The operators could be + (for adding permissions), – (for removing permissions), or = (for explicitly setting permissions). The file and directory permissions could be either of read(r), write(w), or execute(x).
Now, let’s take up a few examples to help you understand things in a better way. Suppose I have a file named Fossbytes whose default permissions are this:
![]()
In case I wish to add the write permission for the members of this file’s group, I can do it in the following manner:

One could remove the write permission by replacing the + operator with the – operator in the above command.
You can also change multiple permissions at a time. Like here I have added the write and execute permissions to the members of the file’s group.

What more? It’s even possible to change the permissions for different categories simultaneously. Here’s how:

In order to explicitly define the permissions, we can use the = operator. When you use the equal sign, then the permissions are set to exactly the ones that you define.

Octal Mode
Another method of specifying file and directory permissions is the octal mode. It is a bit less intuitive, but once you get the hang of it, you will realise that it is a much faster alternative to the symbolic mode.
In the octal mode, permissions are based in binary. Each permission type is treated as a bit that can be either set off (0) or on (1). Remember that the order has a great significance and permissions are always read in the order of read(r), write(w), and execute(x). So, for example, if all r,w, and x are set off, then the binary representation is 000. Similarly, if all of them are set on, then the representation is 111.
To get a number that we can use the chmod command, convert the binary representation into base 10. Basically, you just need to remember that read=4, write=2, and execute=1. The permissions number for the chmod command will be obtained by adding up the values for each permission type. 8 possibilities arise (and hence the name, octal) which are:
0 (000 in Binary): —
1 (001 in Binary): –x
2 (010 in Binary): -w-
3 (011 in Binary): -wx
4 (100 in Binary): r–
5 (101 in Binary): r-x
6 (110 in Binary): rw-
7 (111 in Binary): rwx
A permission number is calculated for each permission group and then specified in the chmod command in the order of user/owner, group and other users. Here is an example:

Warning: Exercise considerable caution while assigning the 777 or 666 permissions. Doing so may allow malicious users to gain access to your system and cause unwarranted trouble as anybody would be free to view, modify, or execute the files having these permissions. In general, it is a good security measure to be careful while assigning permissions and limiting the access of other users.
Another common mistake that beginners could make would be having the correct permissions set for the file, only to have the incorrect permissions on the directory itself. Not having the correct directory permissions would thus prevent them from executing the file.
In case you have set the file permissions correctly and are facing some problems, try inspecting the permissions set on the parent directory by using the ls -ld command and gradually work your way up to the root directory by using the cd command until the problem is solved.
Besides this, you can also study about the file creation mask, the umask statement, special permission modes, or about the sticky bit. We will cover them all in another article.
Try to practice and grasp all the concepts mentioned in this article with utmost sincerity as it will form the very basis of your understanding of the Linux system and will prove to be an important stepping stone in your Linux journey.
Read Our Whole Linux Lexicon Tutorial Series Here
Got any doubts, queries of your own, or any suggestions on the topics that you would like us to cover? Drop them in the comments below.