How To Use iPhone Widgets: Best iOS 14 Widgets You Can Get
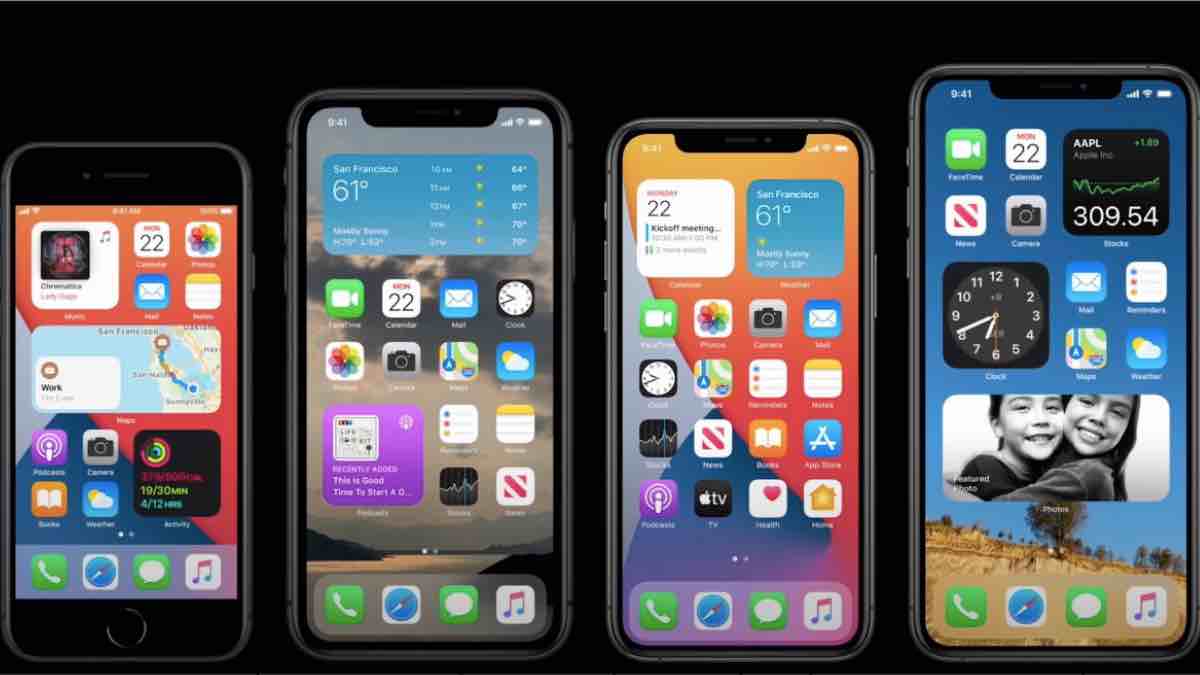
In the Android domain, widgets are tried and tested tools to have instant access to anything and everything. With iOS 14, Apple decided to get its own iPhone widgets, finally letting us take control of the home screen. If you’re making a switch from Android to iPhone, there’s now one less feature that you’ll have to compromise.
The jailbreak community has had widgets on iPhone since the days of iOS 10 and 11; iOS 14 widgets are just the first baked-in widgets from the company. While Apple took its sweet time, it delivered an equally sweet feature. You can use this new addition to iOS 14 as multiple tiles spread across sheets of home screens, or you can just stack them up as one. So here we’ll tell you everything you need to know about iPhone widgets on iOS 14 and some extra customization tricks.
What Is A Widget?
in technical terms, a widget is a part of the graphic user interface (GUI) that runs on a self-contained code that lets you pass certain commands in a certain way to the OS. In simple terms, a widget is a shortcut that displays information on the fly and lets you interact with it to get what you need with fewer clicks. That said, it is certainly handy if you want the battery stats, calendar, and weather right there on the home screen when you unlock the phone.
How To Get Widgets On iPhone?
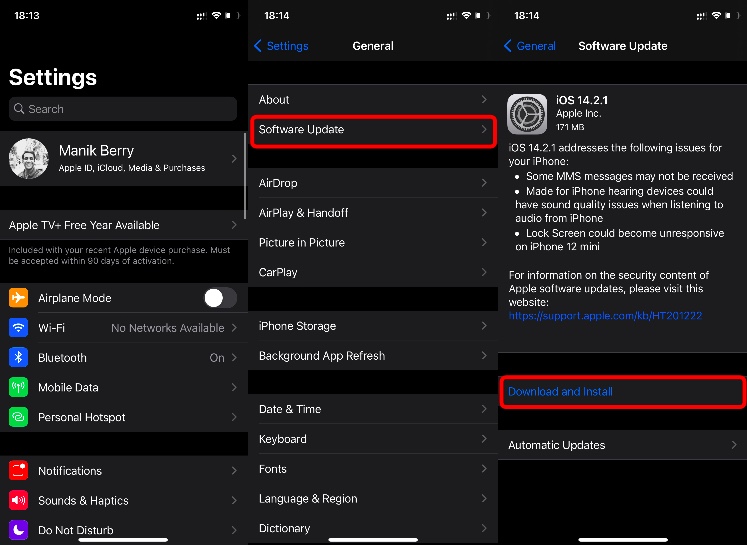
Before you get the widgets, you need to update to iOS 14. You can do that if you have an iPhone 6s/iPhone SE or later model. Just go to Settings > General > Software Update > Download and Install. This will update you to the latest iOS 14, and you won’t only get access to widgets but to the new App Library as well.
Also Read: How To Use iOS 14 App Library: A Good But Half-baked Feature
How To Use iPhone Widgets?
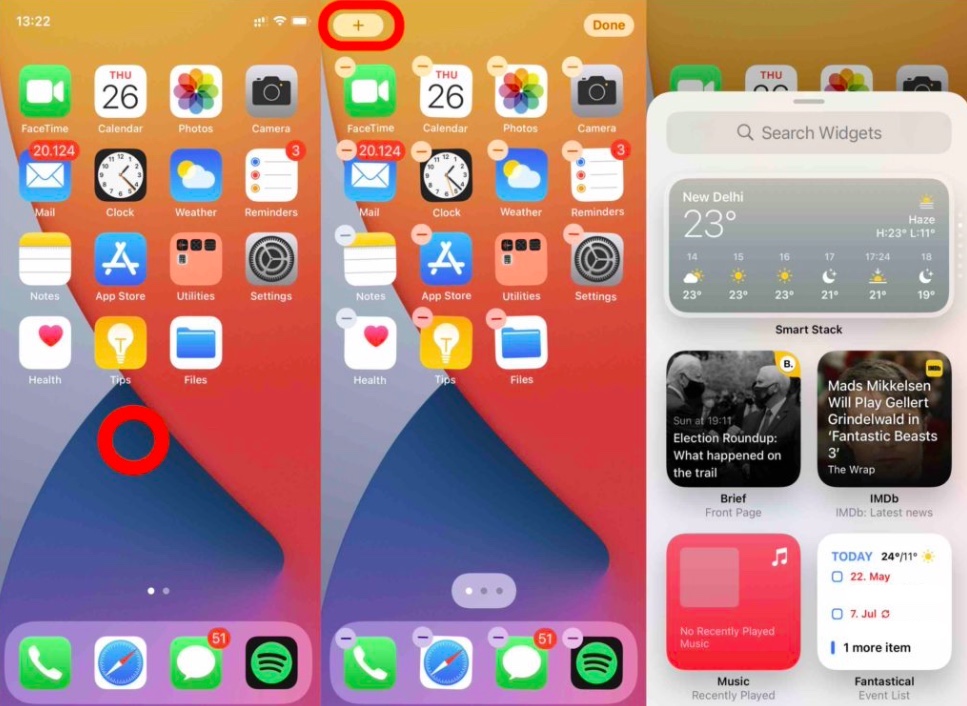
- Go into Jiggle Mode (Long tap on blank space) > Tap The “+” icon on the top left and you’ll see all the available widgets.
- You can either select from the widgets or you can scroll down to see all apps that support widgets.
- You can choose the right size of the widget by tapping on the one you want to select.
If you’re not a fan of widgets on the home screen, you can have them in the “Today view” and access them from the lock screen as well. Here’s how to add iPhone widgets to Today View:
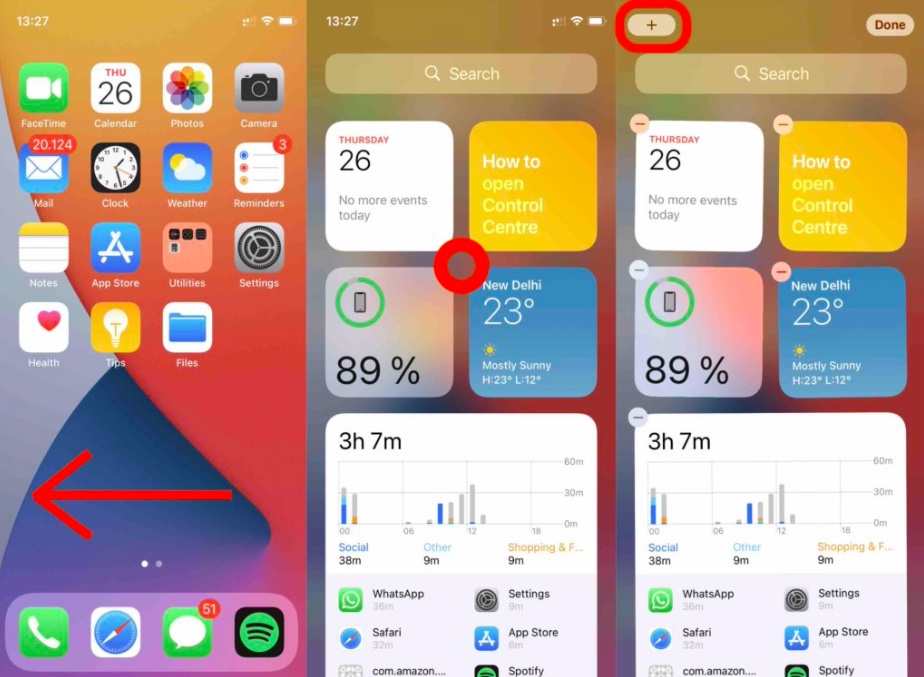
- Swipe right from your home screen until you get to “Today View“.
- Enter Jiggle Mode (Long press on blank space) > Select the ‘+’ icon and drag and drop the widgets on the Today View screen.
How To Use Smart Stacks In iOS Widgets?
This is one of the iOS 14 best widgets. It is so because you can create a stack of widgets and have multiple widgets in the space of a single one. One of the compromises here is that one size doesn’t fit all. You might want a bigger widget for your photos and calendar but a more compact one for the weather. Here’s how to use stacks and enable smart stacks on iOS widgets:
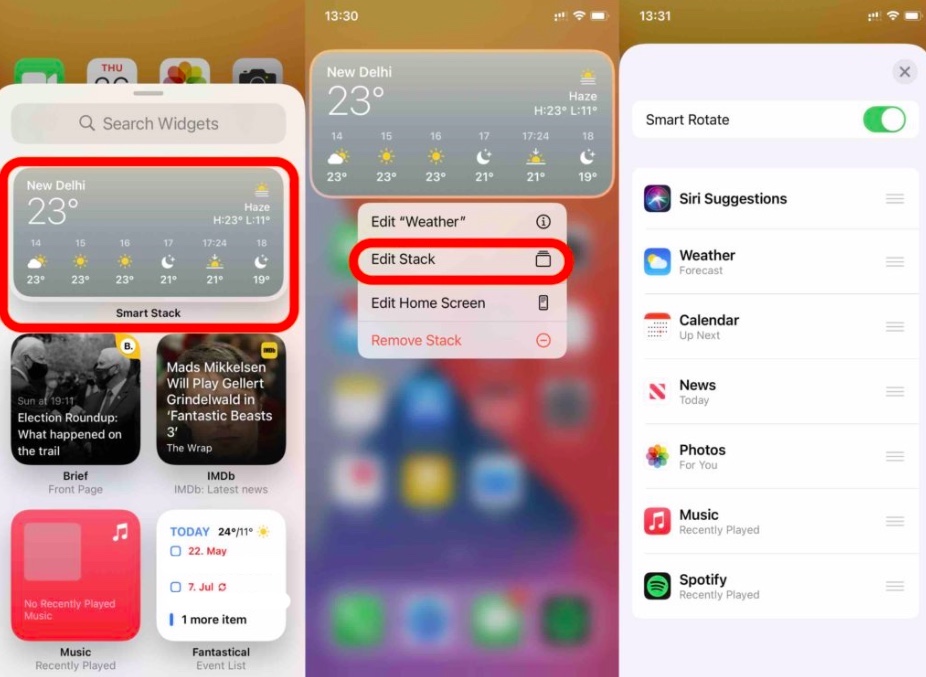
- On the iOS 14 home screen, Jiggle Mode (Long press on blank space) > Tap the ‘+’ icon > Select Smart Stack > Drag and drop your preferred widget size where you want it.
- Long press on the widget and tap Edit Stack. From here, enable or disable smart rotate.
- You can reorder the stacked widgets by dragging them up and down using the ‘☰’ icon.
- There’s also an option to delete a widget from the stack by swiping right on the function you want to remove.
Custom iPhone Widgets
Some of the best iPhone widgets were the ones that came when users were jailbreaking into iOS and showed their creativity. As much as we loved the customization, we hated the loss of warranty that came with it. Fortunately, now there are apps on the App Store that let you create custom widgets.
The one I used is Widgetsmith; it’s a simple app with a lot of customization options. The app also offers an Astronomy widget that shows you the starfield above you. You can also create timed widgets (much like smart stacks). The basic version is free and has most of the features. If you want to go for the premium one, it is available on a subscription basis for $1.99/month or $19.99/year. Here’s how to use the app to make custom iPhone widgets:
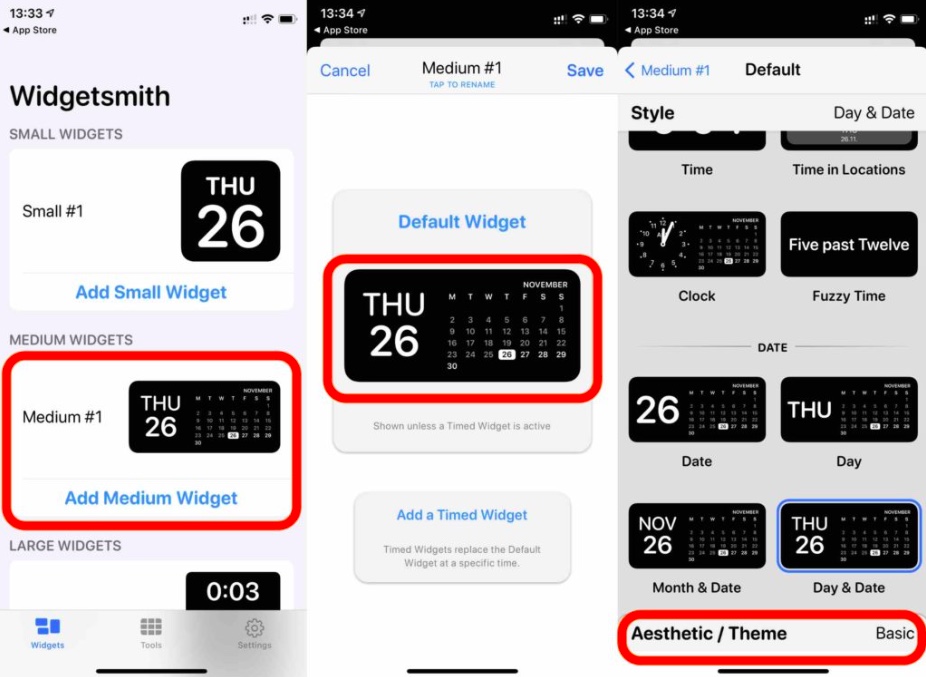
- Open the Widgetsmith app and choose the size of the widget you want to customize. I’ll customize a Medium-sized widget.
- Tap on the given template “Medium #1” or add a new one by tapping on “Add Medium Widget.”
- Browse the given styles and choose the widget you want to use.
- You can customize the look of your widgets by tapping on the “Aesthetic/Theme” tab.
- When you’ve customized it, save it and go to the home screen. Enter Jiggle Mode (Long press on blank space) > Tap the ‘+’ icon and drag and drop the Widgetsmith widget you created.
Once you’ve prepared your first widget, you can add more and create a timed stack which will show you the relevant information when you ask it to. Here’s how to do that:
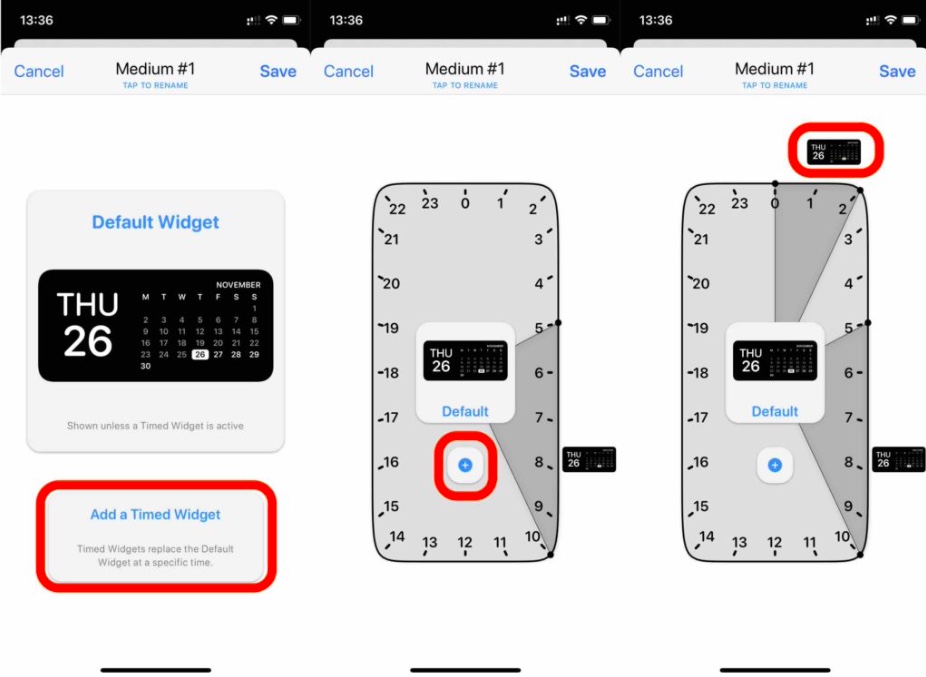
- Open the widget you’ve just created (Or you can create another one if you want this one to be a stand-alone).
- Tap on “Add a Timed Widget“
- Set the time during which you want to see the current widget, and then tap on the ‘+’ icon to add more widgets and set their timings.
- Save the changes. Go to the home screen and Enter Jiggle Mode (Long press on blank space) > Tap the ‘+’ icon and drag and drop the Widgetsmith stack you created.
iOS 14 Best Widgets
What makes widgets even sweeter is that developers on the Apple Store seemed to be eagerly waiting for this, almost as if they knew it’ll happen one day. There are several quality widgets for you to use and here are some of the best iOS 14 widgets:
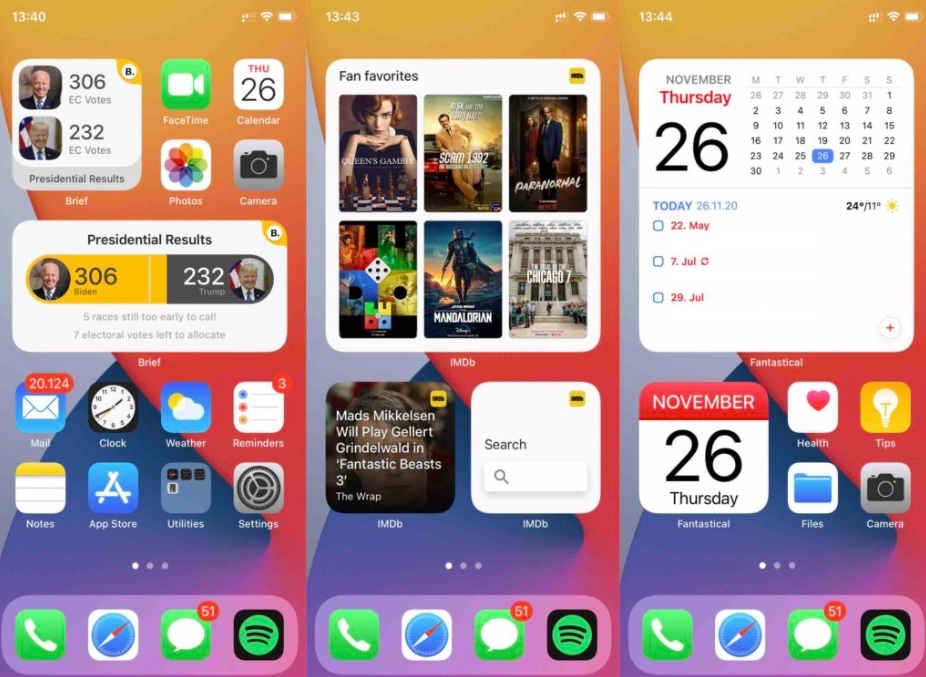
IMDB Wrap is a widget that comes with the updated IMDB app from the App Store. If you’re a cinema-buff, it’s a must-have. Even if you’re not into cinema, the app has widgets that tell you what’s trending so you have suggestions on what to watch next. Next up is Brief. It is a paid app but has a beautiful and useful widget that gives you relevant information at your fingertips. Lastly, you have Fantastical, which is one of the most used calendar apps on the App Store. It offers iPhone widgets in multiple sizes and styles, which makes them useful as well as customizable to your liking. You can use the free version or sign up for the paid version too.


